Are you looking to completely erase all the data on your hard drive so that nothing can be recovered? Darik’s Boot and Nuke (DBAN) is a powerful tool designed just for that purpose.
Whether you’re preparing to sell your computer, repurpose an old drive, or simply want to protect your personal information, learning how to use DBAN will give you peace of mind. In this guide, you’ll discover simple, step-by-step instructions to securely wipe your hard drive using DBAN.
By the end, you’ll be confident in making sure your data is gone for good—no traces left behind. Keep reading to take control of your digital privacy today.
What Is Darik’s Boot And Nuke
Darik’s Boot and Nuke, often called DBAN, is a free software tool. It helps completely erase all data on a hard drive. This means no information can be recovered after use.
Many people use DBAN to protect their privacy. It wipes the drive by overwriting all data with random information. This process makes deleted files impossible to restore.
What Is Darik’s Boot And Nuke?
DBAN is a bootable program designed to erase hard drives securely. It works by overwriting every sector of the disk with random data. This removes all traces of files, folders, and operating systems.
The tool runs outside of the main operating system. You start it from a USB drive or CD before the computer boots. This ensures the entire hard drive is wiped clean.
How Does Dban Work?
DBAN uses strong methods to overwrite data multiple times. It applies patterns created by special algorithms. These patterns prevent recovery of sensitive information.
Once the process begins, DBAN scans for all drives connected to the system. It then erases each one according to the selected method. The user can choose simple or advanced wiping techniques.
Why Use Darik’s Boot And Nuke?
Many users want to securely delete data before selling or disposing of a computer. DBAN removes all personal and business files safely. It also protects against data theft or leaks.
DBAN is useful for IT professionals and anyone handling confidential information. It offers peace of mind that deleted data cannot be accessed later.

Credit: en.wikipedia.org
Why Use Dban For Data Wiping
Using Darik’s Boot and Nuke (DBAN) is a smart choice for erasing data securely. It ensures your data is gone for good. This tool is trusted by many for wiping hard drives safely and completely. It helps protect your privacy by removing sensitive information beyond recovery.
DBAN works by overwriting your hard drive with random data. This process makes it impossible to recover the original files. It is useful before selling or disposing of a computer. Also, it helps when you want to start fresh with a clean drive.
What Makes Dban Reliable For Data Wiping
DBAN uses strong algorithms to erase data. It writes over the entire disk multiple times. This removes all traces of old files. The tool is open-source, so experts can check its safety. It has a simple user interface that anyone can use.
How Dban Protects Your Privacy
Deleting files normally does not remove data completely. DBAN clears data beyond simple deletion. It prevents hackers from recovering private information. This is important for protecting financial and personal data.
Who Should Use Dban
DBAN is ideal for individuals and businesses. People selling old computers benefit from it. Businesses use it to comply with data protection laws. It helps avoid data breaches and identity theft risks.
Cost-effective And Easy To Use
DBAN is free to download and use. It works on most types of hard drives. You only need a USB or CD to boot from. The wiping process is fast and straightforward. No need for advanced technical skills to operate it.
Preparing For Dban Wipe
Preparing for a DBAN wipe is a crucial step to ensure a smooth and safe data removal process. Before starting, take time to organize your files and hardware. Proper preparation helps avoid data loss and technical issues. Follow these steps carefully to get ready for using Darik’s Boot and Nuke effectively.
Backup Important Files
DBAN permanently deletes all data on the hard drive. You cannot recover files after the wipe. Save any important documents, photos, or software to an external drive or cloud storage. Double-check that you have copied everything you need. This step protects your valuable information from accidental loss.
Gather Required Hardware
You need a USB flash drive or blank CD/DVD to create a bootable DBAN disk. Check that your computer can boot from the USB or CD drive. Ensure you have a working keyboard and monitor connected. Having these ready prevents interruptions during the wiping process.
Download Dban Iso
Download the DBAN ISO file from the official DBAN website. Use a reliable internet connection to avoid corrupted files. After downloading, use software like Rufus or ImgBurn to create a bootable USB or CD. Verify the bootable media works by restarting your computer and checking the DBAN menu appears.
:max_bytes(150000):strip_icc()/dban-download-page-a295f1a8c6134da8b5177d8be74c6d9e.png)
Credit: www.lifewire.com
Creating Bootable Media
Creating bootable media is the first step to using Darik’s Boot and Nuke (DBAN). You need a device that can start your computer and run DBAN. This device can be a USB flash drive or a CD/DVD. Both methods allow you to erase your hard drive securely. Follow the instructions below for each option to make your bootable media.
Using A Usb Flash Drive
Start by downloading the DBAN ISO file from the official website. Next, insert a USB flash drive into your computer. Make sure the USB drive is empty or backup any important data, as this process will erase it.
Use a tool like Rufus or Balena Etcher to create a bootable USB. Open the tool and select the DBAN ISO file. Choose your USB drive as the target device. Click “Start” to copy the files and make the USB bootable.
After the process finishes, safely eject the USB drive. Insert it into the computer you want to wipe. Restart the computer and access the boot menu. Select the USB flash drive to boot from. DBAN will start, ready to erase your hard drive.
Using A Cd/dvd
Download the DBAN ISO file and save it on your computer. Insert a blank CD or DVD into your disc drive. Use disc burning software like ImgBurn or CDBurnerXP to burn the ISO to the disc.
Open the burning software and choose the option to burn an image or ISO file. Select the DBAN ISO file and start the burning process. Wait until the disc is finalized and ejected.
Place the CD/DVD into the target computer’s optical drive. Restart the computer and open the boot menu. Choose the CD/DVD drive as the boot device. DBAN will load from the disc, ready to securely erase the hard drive.
Booting From Dban Media
Booting from DBAN media is the first step to securely erase your hard drive. You must prepare a bootable USB or CD with the DBAN software. Insert this media into your computer before starting the process. The system will load DBAN directly from this media, bypassing your operating system.
This method ensures that DBAN has full control over the hard drive. It allows the software to wipe data thoroughly and safely. Follow the steps below to boot from DBAN media correctly and begin the wiping process.
Accessing The Boot Menu
Start your computer and watch for a message about the boot menu key. Common keys include F12, Esc, F2, or Del. Press the key shown quickly before the operating system loads. This action opens the boot menu on most computers.
If you miss the timing, restart and try again. The boot menu lets you choose the device you want to boot from. Without accessing it, your computer may load the usual hard drive instead of DBAN media.
Selecting Boot Device
After the boot menu appears, use the arrow keys to find your DBAN media. This device may be listed as USB, CD/DVD drive, or removable disk. Select the correct option carefully to avoid booting from the wrong device.
Press Enter to confirm your choice. The system will then start DBAN from the selected media. You will see the DBAN interface shortly, ready to wipe your hard drive.
Starting The Wipe Process
Starting the wipe process with Darik’s Boot and Nuke (DBAN) is simple and effective. This step ensures all data on your hard drive is securely erased. You can choose between automatic or manual options to suit your needs. Understanding these choices helps you wipe drives safely and correctly.
Using Autonuke For Automatic Wipe
Autonuke is the fastest way to erase your drive. After DBAN loads, type autonuke at the prompt. This command starts the wipe immediately without further input. It targets all detected hard drives. This method suits users who want a quick and complete wipe.
Manual Selection Of Drives
Manual selection lets you pick which drives to erase. After DBAN boots, press the Enter key to access the menu. Use the keyboard to select specific drives. This option is useful if your system has multiple drives. It helps avoid wiping the wrong drive.
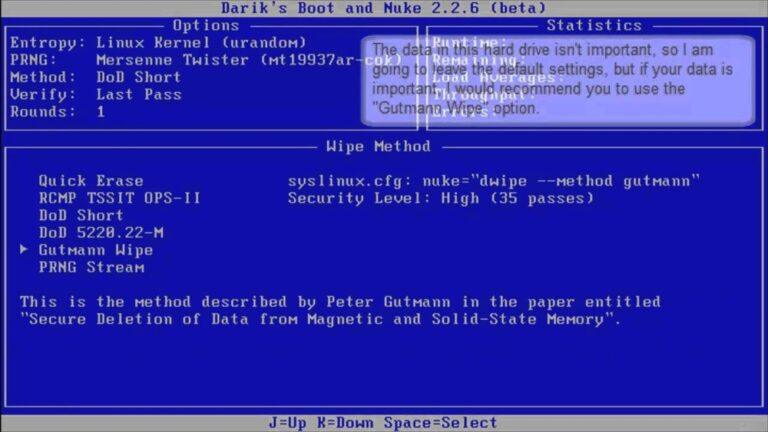
Choosing Wipe Methods
DBAN offers different wiping methods. Some overwrite data once, others multiple times. More passes increase security but take longer. The default method is usually enough to erase data safely. Choose a method based on your security needs and time available.
Monitoring Dban Progress
Monitoring the progress of Darik’s Boot and Nuke (DBAN) is crucial to ensure the data wipe completes successfully. The program works by overwriting your hard drive multiple times. Watching the progress helps you understand how far the process has come and what to expect next.
DBAN displays useful information on the screen during the wipe. It shows the current status, the number of passes completed, and details about the wiping method used. This feedback helps you stay informed and avoid interrupting the process prematurely.
Estimated Time And Completion
DBAN gives an estimated time to finish the wipe. This estimate depends on your hard drive size and the chosen method. Larger drives or more secure methods take longer. The screen updates the time left as the process runs.
You will see a percentage or pass count indicating progress. The process can take from several minutes to hours. Patience is key since stopping too soon can leave data recoverable. Wait for the final confirmation that the wipe is complete.
Handling Interruptions
Interrupting DBAN can cause incomplete data erasure. A power failure or reboot during wiping might leave the drive partially wiped. This can put your data at risk.
If an interruption happens, restart the process from the beginning. DBAN does not resume from where it stopped. Make sure your device is plugged into a stable power source to avoid interruptions.
Do not remove the bootable media while DBAN runs. Let the program finish fully before shutting down the computer. This ensures your data is securely erased and cannot be recovered.
:max_bytes(150000):strip_icc()/dban-quick-commands-5a01e22122fa3a003705fc13.PNG)
Credit: www.lifewire.com
After Wipe Steps
After wiping your hard drive with Darik’s Boot and Nuke (DBAN), there are important steps to follow. These ensure your data is fully erased and prepare your system for future use. Taking the right actions after the wipe helps avoid data loss and system errors.
Focus on verifying the wipe and setting up your computer again. These steps are simple but crucial for a clean start.
Verifying Data Removal
Check if DBAN removed all data completely. Use a data recovery tool to scan the drive. It should find no recoverable files. If some data remains, run DBAN again or try a different wipe method. This step confirms your information is safe and unrecoverable.
Inspect the drive’s properties to see if it shows as empty. This quick check gives confidence in the wipe success. Remember, a clean drive means no old files or sensitive data left behind.
Reinstalling Operating System
After confirming the wipe, start reinstalling your operating system. Use a bootable USB or DVD with the OS setup files. Insert it and restart your computer to boot from this media. Follow the on-screen instructions to install the OS fresh.
Choose the correct drive partition for installation. Avoid skipping formatting options to keep the system clean. A fresh OS installation ensures your computer runs smoothly and securely after wiping.
Tips For Safe Data Wiping
Wiping data safely is crucial to protect your privacy. Darik’s Boot and Nuke (DBAN) helps erase all data on a hard drive. Follow some simple tips to ensure the process works well and avoids mistakes. These tips improve security and prevent accidental data loss on the wrong devices.
Power Supply Considerations
Keep your computer plugged into a reliable power source. A power failure during wiping can cause errors. Use an uninterruptible power supply (UPS) if possible. This device keeps your computer running if the power goes out. Avoid battery power alone for long wiping jobs. Stable power ensures the wiping process completes fully and safely.
Avoiding External Drive Wipes
Disconnect all external drives before starting DBAN. The program wipes all connected drives by default. External drives hold important data you may want to keep. Double-check which drives are connected to avoid wiping the wrong ones. Label or unplug external drives to prevent mistakes. This step saves your extra data from accidental deletion.
Common Issues And Troubleshooting
Using Darik’s Boot and Nuke (DBAN) can sometimes lead to technical challenges. These issues often block the wiping process or cause confusion. Understanding common problems helps you fix them fast and keep your data safe.
Boot Failures
Boot failures happen when the computer does not start DBAN properly. This issue may occur due to incorrect BIOS settings. Check if the boot order prioritizes the USB or CD drive with DBAN. Secure Boot might prevent DBAN from loading. Disable Secure Boot in BIOS to allow DBAN to run. Also, ensure the DBAN media is created correctly without errors. Damaged or incomplete ISO files can cause boot failures. Try remaking the bootable USB or CD using reliable software.
Drive Detection Problems
DBAN may not detect all drives in some cases. This happens if the drive uses unusual hardware or controllers. Some RAID or SSD drives may not appear in DBAN’s list. Updating the system BIOS or firmware can improve drive detection. Changing the SATA mode from RAID to AHCI might help. If the drive is encrypted, DBAN cannot access it. Remove encryption before running DBAN. Also, check cables and connections to ensure the drive is properly linked. Faulty cables can lead to detection issues.
Alternatives To Dban
DBAN is a popular tool for erasing hard drives securely. Still, some users may want different options. Alternatives to DBAN offer varied features and ease of use. These tools can also help protect privacy by wiping data effectively.
Blancco Drive EraserBlancco Drive Eraser provides certified data erasure. It supports many drive types, including SSDs and HDDs. The software offers detailed reports for compliance needs. It is user-friendly and trusted by businesses worldwide.
CCleaner Drive WiperCCleaner includes a simple drive wiping tool. It can erase free space or entire drives. The interface is easy to navigate for beginners. It works well for quick cleanups and privacy protection.
EraserEraser is an open-source data removal tool. It allows secure deletion of files and drives. The tool supports multiple overwrite methods. It integrates with Windows for easy right-click access.
Secure EraserSecure Eraser offers strong data destruction options. It complies with various government standards. The program can erase files, folders, and entire drives. It also provides a straightforward user interface.
Frequently Asked Questions
How Do Darik’s Boot And Nuke Work?
Darik’s Boot and Nuke (DBAN) securely erases hard drives by overwriting data with random patterns. Users boot from a DBAN USB or CD, then start wiping by typing “autonuke,” permanently removing all recoverable data. The process may take several hours to complete.
How To Use Dban Nuke?
Create a bootable USB or CD with DBAN ISO. Insert it into your PC and restart. At the Boot prompt, type “autonuke” and press Enter. DBAN will securely erase all connected hard drives. Wait until the process completes; it may take several hours.
How To Install Darik’s Boot And Nuke?
Download the DBAN ISO from the official site. Create a bootable USB or CD with it. Insert and restart your computer. Select the USB/CD in the boot menu. At the prompt, type “autonuke” and press Enter to start wiping.
How To Boot From Dban?
Create a bootable USB or CD with the DBAN ISO. Insert it, restart the computer, and access the boot menu. Select the USB or CD drive, then type “autonuke” at the Boot: prompt. Press Enter to start wiping your hard drive automatically.
Conclusion
Using Darik’s Boot and Nuke safely removes all data from your hard drive. Follow the steps carefully for best results. Always back up important files before wiping your drive. The process is quick and effective for secure data deletion. Remember, once erased, data cannot be recovered.
This tool helps protect your privacy and security. Trust the method to clean your hard drive fully. Stay patient and let DBAN complete its task properly.

Madison Clark is a footwear expert and the voice behind MyStyleGrid.com. She specializes in honest shoe reviews, style tips, and practical guides to help readers find the perfect pair for any occasion. With years of experience in blogging and content creation, Madison makes footwear knowledge simple, stylish, and easy to follow.