Do you look at your shoes and feel bored? I do sometimes. We buy cool sneakers. We wear them out. But they often look just like everyone else’s. There is a simple fix for this. You do not need new shoes. You just need to change how you tie them. Learning how to star lace shoes is a game-changer. It turns a plain pair of kicks into a work of art.
I remember my first pair of high-tops. They were plain black canvas. I loved them, but I wanted them to pop. I saw a photo online of a star pattern. I tried to copy it. It was a mess at first. The laces were twisted. The star looked like a blob. But I kept trying. Once I got it right, people noticed. Strangers asked me about my shoes. It felt great.
Today, I want to share that feeling with you. I will teach you this cool trick. It is easier than it looks. We will go step by step. I will share my tips so you don’t make my mistakes. Let’s make your shoes stand out!
Why Choose the Star Lacing Method?
You might ask, “Why bother?” That is a fair question. Standard lacing works fine. It keeps your shoes on. But style is about more than function.
Cool shoelace patterns like the star show personality. They show you care about details. It is a small touch. But it makes a big difference. It is perfect for concerts. It is great for school. It works well for parties too.
Also, it is cheap. You do not need money. You just need time. It is a fun project. You can do it while watching TV. It relaxes me. It might relax you too.
Best Shoes for This Style
Not all shoes work for this. I have learned this the hard way.
- Canvas Sneakers: These are the best. Think about Chuck Taylors. The flat tongue helps the star sit flat.
- Skate Shoes: Vans look great with this. They often have wide eyelets. This makes passing the lace through easy.
- Casual Sneakers: Shoes like Stan Smiths work too.
Avoid running shoes. They have too much padding. The star sinks in. It disappears. Also, avoid dress shoes. It looks a bit too wild for a suit. Keep it casual. Keep it fun.

Credit: finuniverblg.ru.net
Essential Tools and Materials
Before we start, let’s gather our gear. You do not need much. But the right tools help.
- Your Shoes: Make sure they have at least 5 pairs of eyelets. Six is better. Five is the minimum for a standard star.
- Laces: This is vital. Not all laces work.
- A Flat Surface: Use a table. It saves your back.
Choosing the Right Length
Length is huge here. I once tried this with short laces. I could not tie the knot at the end. It was frustrating.
Star lacing uses more lace than normal lacing. You have to cross over a lot.
- Low-tops: Aim for 45 inches.
- High-tops: Go for 54 inches or more.
If you are unsure, go longer. You can always hide extra lace. You cannot stretch short lace.
Understanding Shoelace Types
Let’s talk about the laces themselves. This is where expertise matters. I have tried every type.
Flat vs. Round
You must use flat laces. I cannot stress this enough.
- Flat Laces: They lie smooth. They make the star lines sharp. They stay in place.
- Round Laces: They roll around. They make the star look bumpy. The pattern gets lost.
If your shoes came with round laces, swap them. Buy a cheap pair of flat ones. It is worth it. Best laces for star pattern styles are always flat and wide.
Material Matters
Cotton is good. It grips well. It stays tied. Polyester is shiny. It looks cool. But it slips. If you use polyester, pull them tight. Leather laces are tricky. They are stiff. They are hard to weave. Stick to cotton or synthetic blends for your first time.
Color Theory
This is the fun part.
- White on Black: High contrast. The star pops.
- Neon on White: Very 80s. Very fun.
- Tone on Tone: Black lace on black shoe. It is subtle. It looks sleek.
Preparation: Getting Your Shoes Ready
Do not rush. Prep work is key.
Remove Old Laces
Take them out. All of them. Do not leave the bottom one. Start fresh.
Clean the Eyelets
Look at the holes. Are they dirty? Dust hides there. Use a Q-tip. Wipe them out. Clean holes help laces slide. It keeps your new style clean.
Clean the Tongue
The tongue is the canvas for your star. If it is dirty, the star looks bad. Wipe it down. If it is canvas, use a damp cloth. Let it dry. Now you have a clean slate.
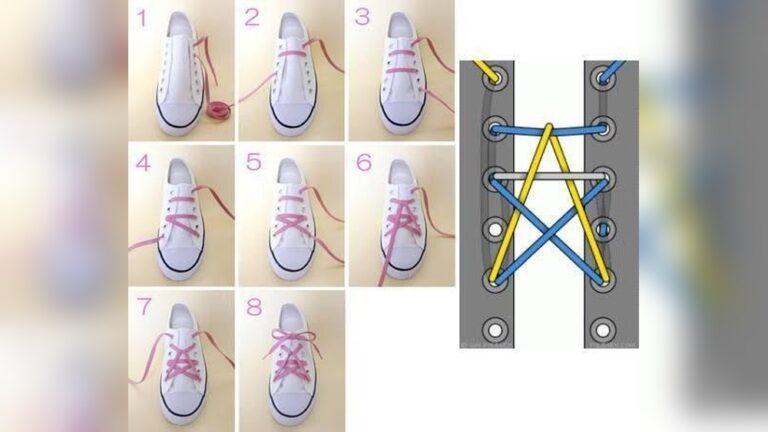
Step-by-Step Guide: How to Star Lace Shoes
Okay, let’s do this. Grab your shoe. Face the toe away from you. Follow me closely. We will take it slow.
Phase 1: The Foundation Bar
- Take your flat lace.
- Find the middle eyelets. Not the bottom ones. This is the trick.
- Count down from the top. Find the 4th eyelet from the top. Or the middle one.
- Feed the lace ends into these eyelets. Go from the outside in.
- You now have a straight bar across the middle of the shoe.
- Pull the ends. Make sure they are even. This is crucial. Uneven ends cause pain later.
Phase 2: Creating the Vertical Anchors
Now we move down.
- Take the left lace end. It is inside the shoe.
- Feed it down to the next eyelet. The one closer to the toe.
- Bring it out.
- Do the same on the right.
- Now you have two ends coming out one step lower.
Now we make a second bar.
- Take the left lace. Cross it over.
- Put it into the right eyelet.
- Take the right lace. Cross it over.
- Put it into the left eyelet.
- Wait! Do not just cross them. We need to weave them.
- Pass the laces under the first bar you made.
- This creates a loop. This loop holds the center of the star.
My Experience: The first time I did this, I skipped the loop. The star fell apart. The loop is the anchor. Do not skip it.
Phase 3: The Cross Over
You should be at the bottom now. Or close to it.
- Pull the laces tight.
- You should see a vertical shape forming.
- Take the left end. Bring it all the way to the bottom eyelet on the left. Inside out.
- Take the right end. Bring it all the way to the bottom eyelet on the right. Inside out.
Phase 4: Forming the Star Point
This is the magic moment.
- Take the left lace.
- Bring it up diagonally.
- Aim for the top empty eyelet on the right side.
- Do not put it in yet.
- Hook it around the middle bar. The very first one you made.
- Now put it in the top right eyelet.
Repeat on the other side.
- Take the right lace.
- Bring it up diagonally.
- Hook it around the middle bar.
- Put it in the top left eyelet.
Look at your shoe. Do you see it? A star!
Phase 5: Tying it Off
You have the star. But you have lace ends.
- Pull the ends tight.
- Tie a bow.
- If you want a clean look, try hidden knot lacing.
- Tie the knot behind the tongue.
- Tuck the excess lace inside.
- Now the star is the only thing people see.

Credit: www.youtube.com
Star Lacing for Specific Brands
Every shoe is different. What works on one might fail on another.
Star Lacing Converse
Star lacing Converse is classic. Why? The eyelets are metal. They are big. The lace slides easy.
- Tip: Converse laces are long. You will have extra. Use the hidden knot. It keeps the long ends safe.
- High-tops: You have a lot of ankle eyelets. You can stop the star at the ankle. Then lace normally up the leg. This looks tough.
Vans and Skate Shoes
Vans have fewer eyelets usually.
- The 5-Eyelet Problem: The star needs space. If you only have 4 eyelets, it is hard.
- The Fix: Skip the very bottom eyelet. Start the star higher. It makes a smaller star. But it works.
Chunky Sneakers (Filas, Nikes)
These are hard. The tongue is puffy.
- Advice: Pull tight. The puffiness fights the star shape. You need tension. But not too much. You do not want to crush the foam.
Common Mistakes to Avoid
I have made them all. Let me save you some time.
Twisted Laces
This is the worst.
- The Issue: A twisted lace ruins the line. It reflects light wrong. It looks messy.
- The Fix: Flatten the lace at every step. Use your thumb. Slide it down the lace before you pull it through. Go slow.
Uneven Lengths
- The Issue: You finish the star. One lace is 10 inches. The other is 2 inches. You cannot tie it.
- The Fix: Check the lengths at the start. Check them again after the first bar. Adjust early.
The Saggy Star
- The Issue: The star hangs loose. It looks sad.
- The Fix: You skipped the anchor loop. Or your laces are slippery. If they slip, use cotton laces. They bite and hold.
Advanced Variations of Star Lacing
Mastered the basic star? Good. Let’s get crazy. There are many creative shoe lacing styles out there.
The Double Star
This is for tall boots. Or high-top sneakers.
- Do a star at the bottom.
- Do a second star above it.
- You need very long laces.
- It looks intense. It is great for festivals.
Multi-Colored Stars
This is a fun hack.
- Take two laces. Different colors. Cut them in half.
- Tie them together. Use a strong knot. Or melt the ends together.
- Lace the shoe so the knot hides behind the eyelet.
- Make the star.
- One side of the star is Red. The other is Blue.
- This is a head-turner.
The Negative Space Star
Use a dark shoe. Use a dark lace.
- The star blends in.
- It creates texture.
- It is not loud. It is sophisticated.
- Great for an all-black outfit.
Comfort vs. Style: The Trade-off
We need to be honest. Sneaker lacing techniques like this are for looks. They are not for performance.
Is it Good for Running?
No. Do not run a marathon in star laces.
- Why? It does not tighten evenly.
- The Risk: Your foot might slide. You might get blisters.
- The Rule: Use this for walking. Use it for hanging out. Use standard cross-lacing for sports.
Adjusting Tension
The star pattern can be tight on the top of your foot.
- The Feel: It presses down on the bridge of the foot.
- The Fix: Loosen the anchor loop slightly. Give your foot room to breathe.
- Test it: Walk around the house. If it hurts, loosen it. Fashion should not hurt.

Credit: www.youtube.com
Maintaining Your Fresh Look
You did the work. Now keep it nice.
Cleaning Laces
White laces get dirty fast.
- Don’t Untie: If you can avoid it, don’t untie the whole star. It takes time to redo.
- Spot Clean: Use a toothbrush. Use mild soap. Scrub the star gently.
- Rinse: Wipe with a wet cloth. Let it air dry.
Keeping the Shape
After you wear them, the star might shift.
- The Routine: When you take them off, tug the center. Straighten the lines.
- Storage: Don’t throw them in a pile. Set them side by side. Treat them like art.
Other Cool Patterns to Try
If you love the star, you will love these too.
The Lattice
This looks like a fence. It is woven tight.
- Pros: Very secure.
- Cons: Hard to tighten.
The Checkerboard
This uses two laces. Two colors.
- Pros: Looks amazing.
- Cons: Very thick. It makes the shoe feel tight.
The Bar Lace
This is clean. Just straight lines.
- Pros: very tidy.
- Cons: A bit boring compared to the star.
Frequently Asked Questions (FAQ)
Can I do this on shoes with 4 eyelets?
It is hard. You can try. But the star looks squashed. 5 eyelets are the sweet spot.
Will this damage my shoes?
No. It puts stress on the eyelets though. If your eyelets are just holes in fabric, be careful. Metal eyelets are safe.
How do I hide the knot at the end?
Tie the knot behind the tongue. Push it down the side of your foot. It might feel a bit bumpy. But it looks clean outside.
Why does my star look crooked?
You probably pulled one side tighter than the other. Loosen it all. Start again. Pull evenly.
What is the best lace length for Converse high-tops?
Go for 54 inches. Or even 60 inches. You want room to work.
Conclusion
You did it! Look at your shoes. They look different, right? They look like you.
Learning how to star lace shoes is a small skill. But it is a fun one. It sets you apart. It shows creativity. I hope you enjoyed this guide. I hope your fingers are not too tired.
Remember, style is about having fun. Don’t stress if it is not perfect. My first try was ugly. My second was okay. My third was perfect. Keep trying.
Try new colors. Try new shoes. Show your friends. Maybe teach them too. You are the expert now. Walk tall in your new stars. You earned it.
Now, go out and show off those kicks!
Madison Clark is a footwear expert and the voice behind MyStyleGrid.com. She specializes in honest shoe reviews, style tips, and practical guides to help readers find the perfect pair for any occasion. With years of experience in blogging and content creation, Madison makes footwear knowledge simple, stylish, and easy to follow.