Glue or replace the heel tip depending on damage; many fixes are quick and cost-effective.
I’ve repaired dozens of heels over the years for friends and clients. This guide shows proven, step-by-step ways to diagnose and repair shoe heels at home or decide when a cobbler is a better choice. You’ll learn how to fix a shoe heel safely, what tools to use, and which fixes are worth your time and money.

Diagnosing the heel problem: what to look for
Before you act, identify the exact issue. Common problems are worn heel tips, loose heels, separated heels, cracked stacked heels, and crushed or compressed heels. Take a few minutes to inspect the shoe and compare both heels.
Look for these signs
- Worn heel tip: the rubber or plastic tip is rounded or missing.
- Loose heel: the heel shifts when you press it side to side.
- Separated heel: glue or nails have failed and the heel lifts away from the sole.
- Cracks or compression: stacked leather or wood layers are splitting or squashed.
How this helps
- A clear diagnosis saves time and materials.
- Some problems need simple parts; others need full replacement.
I always start with a close look under good light. That first five minutes usually tells me whether I can fix it at home or if I should visit a pro.

Source: youtube.com
Tools and materials you’ll need
Having the right tools keeps the repair neat. Use basic tools for most fixes and add specialty items for full heel rebuilds.
Essential tools
- Shoe glue or strong contact cement
- Replacement heel tips and nails
- Sandpaper (80–220 grit)
- Utility knife and small file
- Clamps or heavy books to press glued parts
- Clean cloth and rubbing alcohol
Optional but useful
- Hammer and tiny nails
- Drill bit for tight nail holes
- Shoe anvil or hardwood block
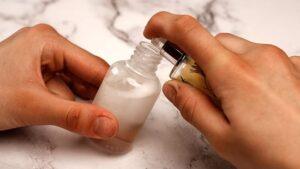
- Shoe repair cement (rubber cement or polyurethane shoe glue)
My go-to glue is a polyurethane shoe adhesive because it bonds rubber, leather, and wood well. I test a small spot before committing to a full repair to avoid surprises.

How to fix a shoe heel: step-by-step repairs
Below are clear steps for common heel issues. Follow them in order and work slowly. Keep parts clean and dry.
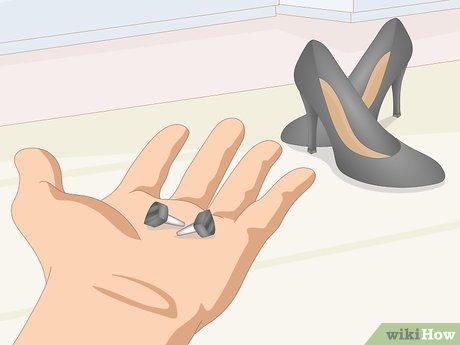
Fixing a worn heel tip
- Remove the old tip with pliers or a knife.
- Clean the post and hole of debris.
- Select a replacement tip that matches size and shape.
- Press the new tip on. If it’s loose, use a tiny nail or adhesive to secure it.
- File and trim to match shape.
Why this works
- New tips restore balance and stop further wear.
- This is the most common and easiest fix for heels.
Reattaching a separated heel
- Clean both surfaces with alcohol.
- Roughen both surfaces lightly with sandpaper.
- Apply contact cement or shoe glue evenly.
- Press heel to sole and clamp for 24 hours.
- For added strength, drive small nails through the heel into the sole if the design allows.
Safety tip
- Use clamps that distribute pressure evenly. Never rush the curing time; weak bonds fail quickly.
Repairing a loose heel post or broken nail
- Remove loose nails or old glue.
- Fill oversized holes with wood glue and toothpicks or a wooden dowel.
- Let the filler dry completely.
- Reattach and secure with a fresh nail or screw sized for heels.
- Seal with glue and clamp while it sets.
Why fillers help
- They restore grip for nails and screws. I’ve fixed many boots this way and they held for months of regular wear.
Fixing cracked or compressed stacked heels
- Clean and dry the heel.
- Glue cracked layers together, working layer by layer if needed.
- Clamp each layer until dry.
- If compression is severe, remove the damaged stack and replace with a new leather or rubber stack.
- Sand and finish to match the shoe.
When to replace
- Deep splits or missing layers often need replacement rather than patching.
Cosmetic touch-ups
- Sand rough edges and apply matching paint or dye.
- Use leather filler for small chips in stacked leather.
- Seal with a clear coat for waterproofing.
These fixes keep shoes wearable and looking sharp. I often do small cosmetic steps after structural fixes to make the shoe look new again.

Replacing a heel tip: detailed guide
Replacing the heel tip is a common task. This section gives a tight checklist so you don’t miss steps.
Checklist
- Buy the right size tip. Try to match the diameter and shape.
- Remove old parts and clean the area.
- Test-fit the new tip before gluing.
- Use a hammer gently or a hand press to seat the tip fully.
- Add adhesive for durability and let dry.
Time and cost
- Most tip replacements take 20–60 minutes.
- Tips are inexpensive; the biggest cost is your time or a small cobbler fee.
I once replaced tips on five pairs in an afternoon. A simple kit and a small hammer made quick work of all of them. The shoes walked out in better shape than when they came in.

Maintenance and prevention: keep heels healthy
Regular checks extend heel life. Simple habits prevent frequent repairs.
Maintenance tips
- Rotate shoes. Don’t wear the same pair daily.
- Add protective heel caps before tips wear out.
- Avoid walking on rough surfaces when possible.
- Dry shoes properly if wet to avoid glue failure.
When to get professional help
- If the heel core is damaged or you want original styling restored.
- For high-value or designer shoes where mistakes are costly.
A small monthly check saves money. Fixing small wear early avoids complex rebuilds later.

DIY vs professional repair: choosing the right path
Weigh cost, time, and skill. Some fixes are easy; others need tools and experience.
Do it yourself if
- The damage is limited to heel tips or minor separations.
- You have basic tools and patience.
- The shoe isn’t expensive or sentimental.
See a cobbler if
- The heel is structurally damaged or the shoe is valuable.
- You need exact color, shape, or brand-specific parts.
- You prefer a long-term, durable repair.
From my experience, DIY handles about 70% of heel problems. The other 30% require a pro touch for longevity and finish.

Frequently Asked Questions of how to fix a shoe heel
What is the easiest way to fix a shoe heel at home?
The easiest fix is replacing a worn heel tip. Remove the old tip, clean the post, and press on a new tip or secure it with adhesive and a small nail.
How long does glue take to set when you fix a shoe heel?
Curing time varies by adhesive. Many shoe glues need 24 hours to reach full strength, though tack-free time may be shorter.
Can I use super glue to fix a shoe heel?
Super glue works for quick small fixes, but polyurethane shoe glue or contact cement is usually stronger and more flexible for heels.
When should I see a cobbler instead of DIY?
See a cobbler for major structural damage, complex heels, or valuable shoes. Professionals offer stronger repairs and cosmetic matching.
Is it worth replacing a heel tip on an old shoe?
Yes, replacing a worn heel tip is usually cheap and restores balance and comfort. If the heel structure is sound, this is a high-value repair.
Conclusion
You can fix many common heel problems at home with the right diagnosis, tools, and patience. Start by identifying the issue, then follow clear steps for tip replacement, re-gluing, or layered repairs. When in doubt, choose a cobbler for valuable or complex jobs. Take action today: inspect your shoes, try a simple tip replacement, or schedule a professional repair to keep your footwear comfortable and safe. Share your experience or questions below, and subscribe for more practical shoe care tips.

Rubel Miah is the Senior Editor at MyStyleGrid.com, where he brings a sharp editorial eye and an unshakable love for fashion to everything he does. A true style addict, Rubel lives and breathes trends, from streetwear to high fashion, and has a knack for turning inspiration into impactful stories. With years of experience in fashion journalism and digital media, he curates content that empowers readers to express themselves through style. When he’s not editing features or forecasting the next big thing, you’ll find him hunting down vintage pieces or capturing street style moments around the city.