Wrapping a shoe box is simple: use clean paper, fold tight corners, and secure edges neatly.
A well wrapped shoe box does more than hide a plain container. It turns something ordinary into a polished gift, a tidy storage piece, or a branded presentation that feels intentional. I’ve wrapped plenty of boxes over the years, from last minute birthday gifts to retail sample boxes, and the difference always comes down to the same basics: measuring well, folding cleanly, and finishing with care.
What it means to wrap a shoe box
Wrapping a shoe box means covering the outside of the box with paper, fabric, or another decorative material so it looks neat and finished. Most people do this for gifts, storage, shipping presentation, or display. The method is simple, but the result looks much better when you use the right paper weight, the right tape, and a clean folding technique.
A shoe box is especially easy to wrap because of its straight edges and flat sides. That said, the lid can make things tricky if the fit is loose or if the paper is too thick. In my experience, the best results come from treating the lid and base as separate pieces when needed, especially if you want sharp corners and a professional look.

Materials you need to wrap a shoe box
Before you start, gather everything in one place. This saves time and keeps the process smooth.
- Wrapping paper, kraft paper, scrapbook paper, or fabric
- Scissors
- Double sided tape or clear tape
- Ruler or measuring tape
- Pencil
- Ribbon, twine, stickers, or tags for finishing
- Optional: glue dots, corner stickers, or a bone folder for crisp folds
The paper matters more than people think. Thin paper tears too easily, while very thick paper can bulk up the corners. For most shoe boxes, medium weight wrapping paper or kraft paper gives the best balance of strength and neatness.
How to wrap a shoe box step by step
1. Measure the box first
Set the shoe box on the paper and make sure you have enough coverage on all sides. Leave enough extra paper to overlap by about 1 to 2 inches. That little bit of overlap helps you avoid gaps and uneven seams.
If you skip measuring, you often end up with awkward patches or wasted paper. I learned that the hard way early on when I tried to save time and ended up rewrapping the whole box. A quick measurement always takes less time than a messy fix.
2. Cut the wrapping paper
Cut a clean rectangle that can cover the box base or lid with some extra room for folding. Keep the cut straight if you want the final wrap to look polished. A ruler helps, but a steady hand and careful eye work fine too.
Lay the box on the paper to test the fit before cutting all the way. It is better to cut a little large than too small. Too much paper can be trimmed later, but too little paper usually means starting over.
3. Center the box on the paper
Place the shoe box in the middle of the cut paper. Make sure the side you want showing most is facing down if you are using decorative paper. This matters if the paper has a pattern, logo, or direction.
Centering the box helps the seams land in the right place. It also makes the corners line up more evenly. A box that starts off crooked usually ends up crooked at the end.
4. Wrap one long side over the box
Bring one long side of the paper up and over the box. Pull it snug, but do not stretch it so hard that it bends the paper. Then bring the opposite side over and overlap it slightly.
Tape the seam along the edge where it will not show much. I usually place the tape under the edge for a cleaner look. Clear tape works well, but double sided tape gives the neatest finish because it disappears.
5. Fold the ends like a gift box
At each end, push the paper inward to form neat triangles. Then fold the top flap down and the bottom flap up, just like wrapping a present. Tape each flap in place.
This part can feel awkward the first time, but it gets easier fast. The goal is to create sharp, flat corners instead of puffy lumps. If your paper is wrinkled, smooth it with your hand before taping.
6. Repeat for the lid if needed
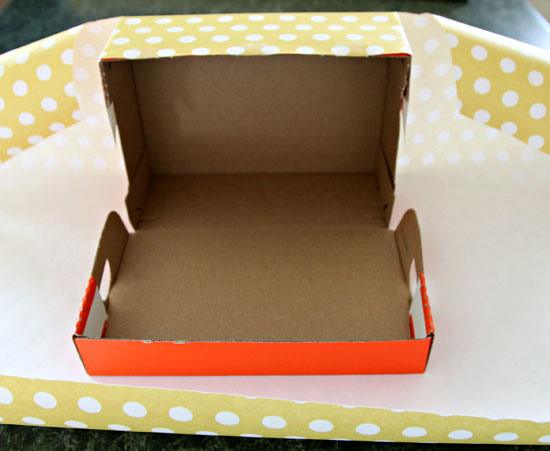
If the shoe box has a separate lid, wrap the lid and base separately. This gives the cleanest result and lets the box open easily. It also prevents the paper from pulling apart when the lid moves.
For gift boxes, I often use a slightly different paper on the lid and base for contrast. That small detail makes the box look more thoughtful without adding much work. It is one of the easiest ways to make a plain shoe box look intentional.
7. Add the finishing touches
Once the box is wrapped, add ribbon, twine, a label, or a bow. Keep the decoration in proportion to the box size. A small box looks better with simple trim, while a larger box can handle more visual detail.
A clean finish is more important than a busy finish. Too many decorations can hide the work you just put into the wrap. If the paper is already attractive, a single ribbon is often enough.

Best ways to wrap a shoe box for different uses
For gifts
When wrapping a shoe box as a gift, focus on neat corners and a smooth top surface. Use festive paper, but avoid overly thin sheets that show every crease. A matching tag or ribbon can make the gift feel more personal.
For storage
If the shoe box is for storage, kraft paper or contact paper is a smart choice. These materials are durable and can stand up to handling. Label the outside clearly so you can find what you need later.
For shipping or mailing
If you are wrapping a shoe box for shipping, remember that decorative paper alone is not enough for protection. Add padding inside the box and use sturdy outer packaging if the box will be mailed. A wrapped shoe box may look nice, but shipping safety still comes first.
For craft or display use
For displays, fabric wrap, scrapbook paper, or textured paper can add style. This works well for event setups, handmade products, or themed decorations. In my own projects, I have found that texture often matters more than color because it creates depth in photos and in person.
Common mistakes to avoid when wrapping a shoe box
Even a simple shoe box can look messy if a few basic errors slip in.
- Using paper that is too small and leaves gaps
- Cutting uneven edges that make the wrap crooked
- Applying too much tape, which creates bumps
- Wrapping too tightly and tearing the paper
- Ignoring the corners, which makes the box look bulky
- Using heavy paper on a loose lid that will not stay neat
One of the biggest mistakes I see is rushing the corners. Corners tell the story of the whole wrap job. If they are clean, the box looks professional even if the rest is simple.
Smart paper choices for a better finish
Not all paper wraps the same way. The best choice depends on the look you want and how often the box will be handled.
- Wrapping paper works well for gifts and quick projects
- Kraft paper gives a classic, simple look and is easy to label
- Decorative paper is great for craft boxes and special occasions
- Fabric wrap adds texture and can be reused
- Contact paper offers durability for storage and repeated use
If you want a smooth finish, choose paper that bends easily without cracking. If you want durability, choose something stronger and less glossy. The right choice saves time and makes the result look more polished.
How to make a shoe box look more professional
A professional finish is mostly about control. Keep your folds straight, your seams hidden, and your tape minimal. Use a ruler when needed and smooth each edge before moving to the next step.
A few small upgrades can make a huge difference.
- Use double sided tape for invisible seams
- Trim excess paper instead of folding it over too many times
- Match ribbon color to the paper for a coordinated look
- Add a printed label or monogram for a custom feel
- Choose matte paper if you want a more elegant result
I have found that simplicity often looks more expensive than clutter. One clean ribbon can do more than three bows and five stickers.
Why wrapping a shoe box neatly matters
A neatly wrapped shoe box gives a better first impression. It shows care, whether the box is a gift, a product sample, or a storage container. Small details like tight corners and smooth seams create trust because they signal effort and attention.
There is also a practical side. A wrapped box can protect the surface from scuffs, dust, and handling marks. That matters when the box will sit on a shelf or be passed around at an event. The wrap is both decoration and light protection.
Frequently Asked Questions of how to wrap shoe box
What is the easiest way to wrap a shoe box?
The easiest way is to use a single sheet of wrapping paper, center the box, and fold the ends like a gift. Keep the paper slightly larger than the box so you have room to tape and trim.
Should I wrap the lid and base separately?
Yes, if the shoe box has a separate lid, wrapping them separately usually looks cleaner. It also makes the box easier to open and close without damaging the paper.
What kind of paper works best for a shoe box?
Medium weight wrapping paper or kraft paper works best for most shoe boxes. These papers fold well, stay neat, and do not tear as easily as very thin paper.
How do I keep the corners neat?
Fold the paper inward to form clear triangles before taping. Press each fold flat with your hand or a bone folder so the corners stay crisp and smooth.
Can I wrap a shoe box without tape?
Yes, you can use glue dots, stickers, or even ribbon to hold the paper in place. Tape is still the easiest choice for most people because it is fast and secure.
Conclusion
Wrapping a shoe box is one of those simple skills that pays off right away. With the right paper, clean folds, and a little patience, you can turn a plain box into something that looks thoughtful and polished. Whether you are wrapping a gift, organizing storage, or creating a display, the same basic steps will give you a strong result.
Start with a careful measure, keep your corners tight, and finish with one or two details that match the purpose of the box. Try it on your next shoe box project, and you will probably notice the difference immediately. If you want more practical tips like this, keep exploring and share your own wrapping tricks in the comments.

Rubel Miah is the Senior Editor at MyStyleGrid.com, where he brings a sharp editorial eye and an unshakable love for fashion to everything he does. A true style addict, Rubel lives and breathes trends, from streetwear to high fashion, and has a knack for turning inspiration into impactful stories. With years of experience in fashion journalism and digital media, he curates content that empowers readers to express themselves through style. When he’s not editing features or forecasting the next big thing, you’ll find him hunting down vintage pieces or capturing street style moments around the city.