Have you ever dreamed of wearing sneakers that are truly one of a kind? Imagine stepping out in shoes you made yourself—shaped exactly to your style and comfort.
Making your own sneakers isn’t just a cool hobby; it’s a way to express who you are, save money, and learn a new skill. You’ll discover simple steps to create sneakers that fit your feet and personality perfectly. Ready to start turning heads with your custom kicks?
Keep reading, and let’s make your sneaker dreams a reality.
Credit: theennisyogastudio.ie
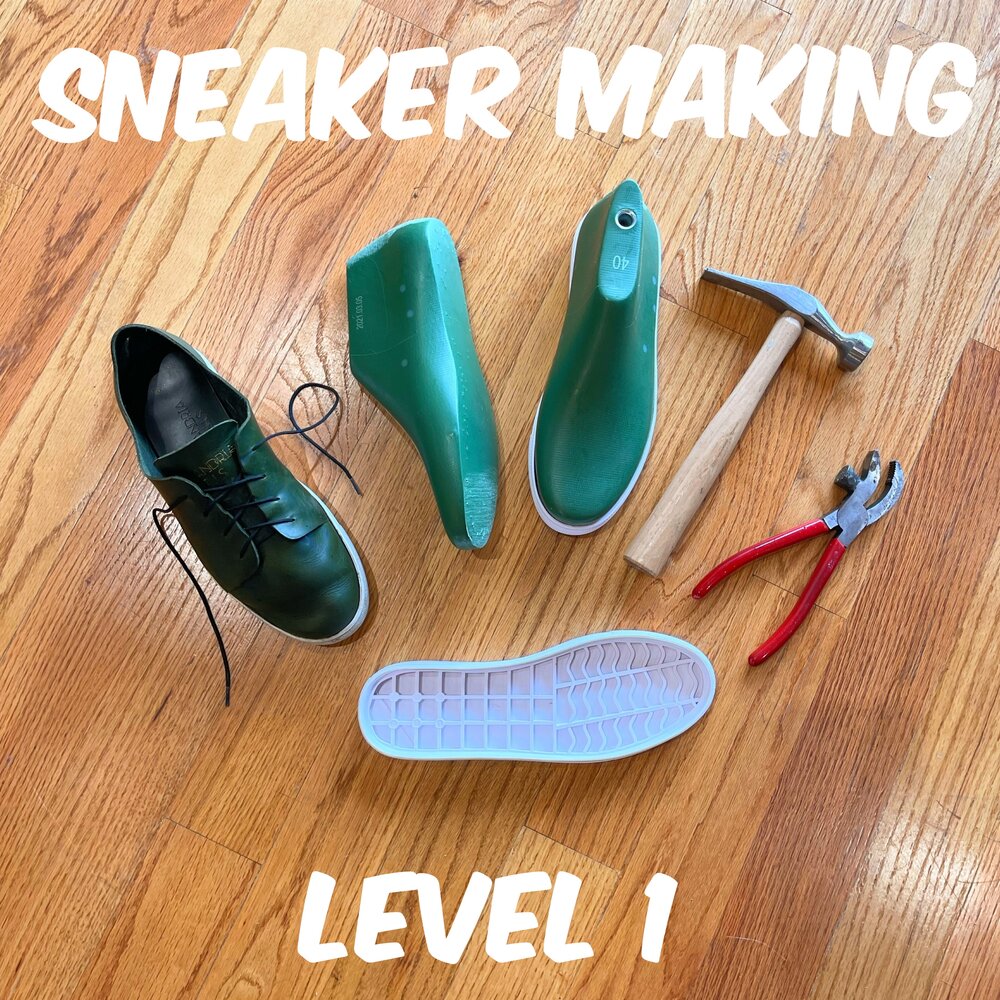
Materials And Tools Needed
Choosing the right fabricis key for making sneakers. Cotton canvas is strongand easy to sew. Leather offers a classic lookand lasts long. Mesh fabric lets your feet breatheduring exercise. Pick a fabric that fits your style and comfort needs.
Essential tools include sharp scissors, a sewing needle, and strong thread. A shoe last or mold helps keep the sneaker shape. You need glue that sticks to fabric and rubber soles. A pencil for marking and measuring tape are also important.
Extra supplies can make your sneakers unique. Paints or fabric markers add color and designs. Laces can be swapped for different colors or styles. Small patches or stickers give your shoes a personal touch. These items help you customizeyour sneakers easily.
Credit: alexandriawills.com
Designing Your Sneakers
Start by drawing your sneaker ideaon paper. Keep the shapes simple. Focus on the basic outline first. This helps to see the shoe’s form clearly.
Pick colors and patternsthat match your style. Use two or three colors to keep it easy. Patterns like stripes or dots add fun without too much detail.
Make a templateby cutting out your sketch. Use cardboard or thick paper. This template guides you when cutting fabric or leather. It helps keep all parts the right size.
Preparing The Sole
Solescome in many types: rubber, EVA foam, and leather. Rubber soles are durableand grip well. EVA foam is lightand cushionsyour steps. Leather soles are classicbut less flexible. Choose based on your shoe’s use.
Cutting the sole needs care. Use a sharp knifeor scissors. Follow the shape of the shoe’s bottom. Make sure edges are smoothand even.
Attaching the sole is key. Use strong gluemade for shoes. Press the sole to the upper firmly. Let it dry for several hours. For better hold, sew the sole to the upper after gluing.
Constructing The Upper
Start by choosing strong fabricfor the sneaker upper. Use a sharp pair of scissors to cut clean piecesfollowing your pattern. Take your time to match the shapesexactly.
Sew pieces together using a simple straight stitch. Keep stitches even and tightfor better strength. Use a sewing machine or sew by hand with a needle and thread.
Add reinforcementsat stress points like the toe and heel. Use extra fabric or thin foam for padding. This helps the sneaker last longer and feel comfortable.
Assembling The Sneaker
Start by placing the upper partof the sneaker on top of the sole. Make sure they fit well together. Use strong glueto stick the edges. Press firmly to avoid gaps.
Next, sew the upper and sole carefully. This adds extra strengthand keeps the parts from coming apart. Use thick thread and small stitches for the best hold.
Finally, place the insoleinside the sneaker. It should sit flat and feel comfortable. The insole helps with supportand cushioningwhen you walk.
Finishing Touches
Adding laces and eyeletsgives your sneakers a neat, finished look. Choose laces that match your shoe colors or go bold with bright tones. Eyelets help keep laces in place and make tying easier. You can buy eyelets in different sizes and colors to fit your style.
Customizing with paint and accessorieslets you make your sneakers truly unique. Use fabric paint to draw designs or write words. Stickers, patches, or charms can also add personality. Make sure paint is safe for fabric and dries well.
Waterproofing and protectionhelp your sneakers last longer. Spray a waterproof shield to keep shoes dry in rain or snow. It also protects colors from fading. Test sprays on a small spot first to avoid damage.
Tips For Success
Common mistakesinclude using the wrong glue or poor stitching. Avoid rushing the process; take your time with each step. Choosing low-quality materialscan cause your sneakers to wear out fast. Remember to measure your feet carefully for a good fit. Skipping the drying time after gluing is a big error. Also, avoid uneven cutting to keep the shoes comfortable and neat.
To keep your handmade sneakerslooking fresh, clean them gently with a soft brush. Use mild soap and water for stains. Store your sneakers in a dry place to prevent damage. Check the soles regularly and repair small tears early. Avoid wearing them in harsh weather to extend their life.
| Resource Type | Description | Where to Find |
|---|---|---|
| Video Tutorials | Step-by-step guides on sneaker making | YouTube, Craft Websites |
| Books | Detailed instructions and tips | Local library, Online stores |
| Forums | Community advice and shared experiences | Reddit, Craft forums |
| Workshops | Hands-on learning with experts | Local craft centers, Art schools |

Credit: schoenenkwartier.nl
Frequently Asked Questions
What Materials Do I Need To Make Sneakers At Home?
You need fabric, rubber soles, strong glue, thread, needles, and laces. Quality materials ensure durability and comfort. Choose breathable fabric for better foot ventilation. Proper tools like scissors and measuring tape help in accurate crafting.
How Long Does It Take To Make Custom Sneakers?
Making sneakers from scratch takes 6 to 12 hours. Time varies based on design complexity and skill level. Beginners may take longer due to learning and adjustments. Patience is key for a well-crafted, comfortable shoe.
Can I Customize Sneaker Designs Easily?
Yes, customizing designs is simple with fabric paint, patches, or embroidery. Personal touches make your sneakers unique and stylish. Use waterproof materials to keep designs lasting longer. Experiment with colors and patterns for creativity.
Is Making Sneakers Cost-effective Compared To Buying?
Making sneakers can be cost-effective if you source materials wisely. It saves money on brand premiums and allows reuse of parts. However, initial investment in tools might be higher. Handmade sneakers offer personalization not available in stores.
Conclusion
Making your own sneakers can be fun and rewarding. You control every step and design. It saves money and lets you express your style. Practice helps you improve with each pair. Start small and enjoy the process. Soon, you’ll have unique shoes nobody else owns.
This skill grows with time and patience. Give it a try and see what you create!

Madison Clark is a footwear expert and the voice behind MyStyleGrid.com. She specializes in honest shoe reviews, style tips, and practical guides to help readers find the perfect pair for any occasion. With years of experience in blogging and content creation, Madison makes footwear knowledge simple, stylish, and easy to follow.