Fix most broken sandal straps cheaply with basic tools, glue, and simple stitching.
I have repaired dozens of sandals, from flip-flops to leather strappy pairs, and I will walk you step by step through how to repair broken sandal straps cheaply. I combine hands-on experience, practical tips, and clear decision rules so you can fix sandals at home without wasting money. Read on for proven fixes, tool lists, cost estimates, and smart tricks I use in my own repairs.
Tools and materials you need to repair broken sandal straps cheaply
To fix straps fast and on a budget, gather a few cheap tools. Most items cost under ten dollars. Use what you already have when possible.
- Glue suited for shoes, such as contact cement, shoe glue, or strong craft adhesive.
- Needles and strong thread or waxed polyester thread for stitching.
- Small pliers and flathead screwdriver for pulling or prying.
- Scissors, utility knife, and sandpaper for prepping surfaces.
- Replacement rivets, small screws, or metal eyelets if hardware failed.
- Thin leather scraps, fabric scraps, or old straps for patches.
- Zip ties or elastic cord for temporary or low-cost fixes.
- Clamps, heavy books, or clothespins to hold parts while glue dries.
I keep a small repair kit in my closet. It saves time and money. The goal is to repair broken sandal straps cheaply without buying a new pair.

Quick fixes for common strap types
Different straps break in different ways. Match the fix to the type to repair broken sandal straps cheaply and well.
- Toe-post (flip-flop) pulls out
- Re-secure with glue and a plug or knot the post beneath the sole.
- Straps torn where they attach to the sole
- Reinforce with stitching, rivets, or shoe glue plus a patch.
- Elastic or fabric strap stretched or frayed
- Replace with elastic cord or sew on a new piece.
- Buckle or hardware failure
- Replace hardware or use a small screw and washer as a cheap fix.
- Broken decorative strap
- Use glue and small stitches, or replace with matched trim.
I once fixed a beach pair by knotting the toe-post under the sole and gluing it. The sandals lasted another season. Simple work and low cost make these fixes a go-to.

Step-by-step repairs: How to repair broken sandal straps cheaply by scenario
Follow these clear steps for common repairs. Keep sentences short and tools simple.
Repair a pulled-out toe-post on flip-flops
- Trim the torn or ragged end of the post.
- Sand inside the hole lightly so glue grips.
- Apply a small bead of strong glue inside the hole.
- Push the post back in and form a tight knot or a small plug under the sole.
- Clamp or press the sole for one hour. Let cure fully per glue instructions.
This method is quick. It often restores fit for months. It cost me under $2 per repair.
Fix straps torn at the sole attachment
- Clean the area and remove loose bits.
- Apply shoe glue between strap base and sole.
- For extra strength, add a small patch under the sole using leather or strong fabric.
- Stitch through the strap and patch if you can. Use a heavy needle and waxed thread.
- Press and let glue cure. Test gently before full wear.
A patched area spreads stress. That keeps straps from pulling free again.
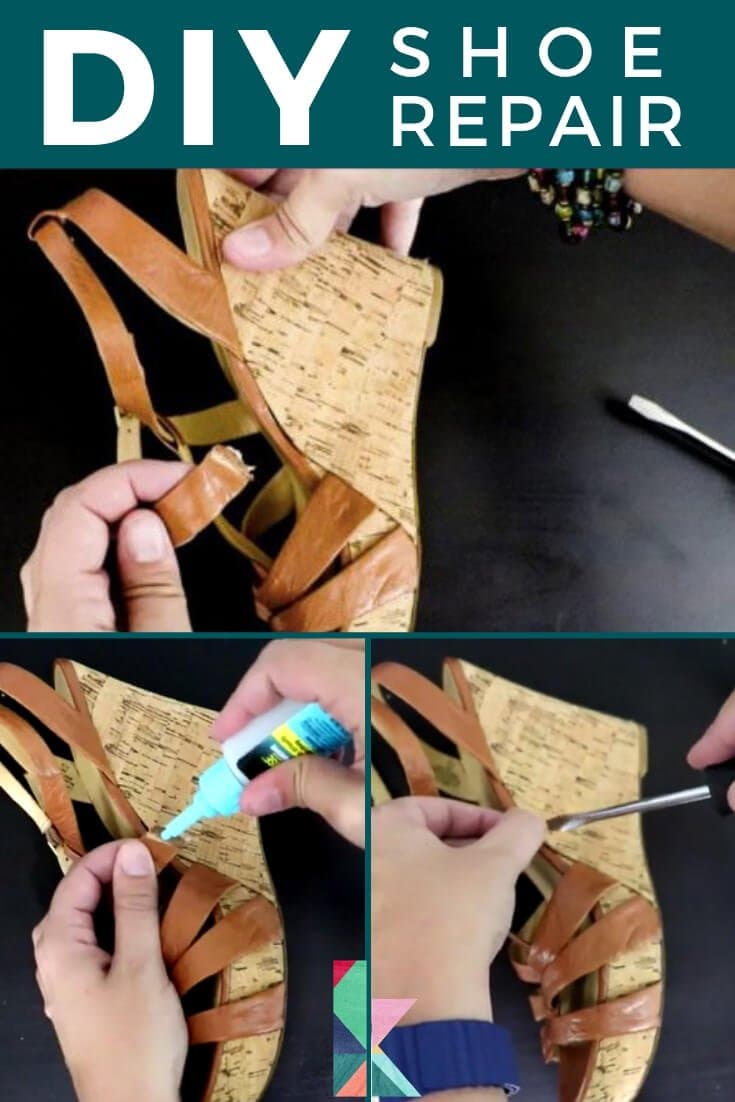
Replace a broken leather or fabric strap
1. Measure the old strap length.
2. Cut new material from scraps or an old belt.
3. Sew or glue ends to original hardware or directly to the sole.
4. Use rivets or small flat-head screws for high-stress spots.
5. Trim and finish edges so they feel smooth.
Using scraps is cheap and often matches the look well.
Reattach a strap using rivets or eyelets
- Mark the spot and drill a tiny pilot hole.
- Insert the rivet or eyelet and set it with pliers or a small setter.
- Add glue for added hold under the fastened area.
- Test strap tension and adjust if needed.
Rivets cost a few dollars and last longer than glue alone.
Temporary fixes and hacks that last
- Use a zip tie around a strap base inside the sole for a fast hold.
- Tie a strong knot and glue the ends for a quick toe-post fix.
- Wrap a strap with paracord for added grip and strength.
Temporary hacks can be surprisingly durable when done right.

Cost breakdown and how to keep repairs cheap
Knowing costs helps you decide whether to repair or replace. Here’s a simple breakdown.
- Glue: $3 to $10 per tube. One tube fixes many sandals.
- Thread and needle: $2 to $6 per set.
- Rivets and eyelets: $3 to $8 for a small pack.
- Replacement leather or strap material: $0 if using scraps, $5 to $15 new.
- Tools (pliers, punch): one-time cost. Borrow to save.
Buy small packs to keep initial spend low. Use items you already own. I estimate most repairs cost $1 to $7 in materials. Time spent is usually 15 to 45 minutes.

When to repair vs when to replace sandals
Not every pair is worth fixing. Use these quick checks.
- Repair if the sole is solid and only straps are damaged.
- Replace if the sole is worn thin, cracked, or missing cushioning.
- Repair cheap or sentimental sandals. Replace expensive pairs if damage is structural.
- Consider safety: if slipping or uneven wear is present, replace.
I repair about 70% of my sandals. The rest go to recycling or donation. Repair when the fix restores safe use.

Practical tips, mistakes to avoid, and personal lessons
From my hands-on work, these tips save time and avoid rework.
- Always clean surfaces before gluing. Dirt reduces bond strength.
- Use clamps or heavy books to keep parts tight while glue cures.
- Don’t overuse glue. Excess can stay sticky or discolor the sandal.
- Match materials when possible. Leather on leather bonds better than leather on plastic.
- Test repaired shoes indoors first for an hour to ensure hold.
- Keep a repair kit ready. It speeds fixes and cuts costs.
One mistake I made was skipping reinforcement for a strap at the sole. It pulled out two weeks later. I learned to add a patch for longevity.

Frequently Asked Questions of how to repair broken sandal straps cheaply
How long will a cheap sandal strap repair last?
Most repairs last months to a year depending on use and quality of the fix. Heavy use like daily walking shortens life, while occasional wear extends it.
Is glue alone enough to repair broken sandal straps cheaply?
Glue alone can work for low-stress straps, but combining glue with stitching or a rivet gives much stronger results. Use glue for quick fixes and reinforcement.
Can I replace a strap myself without special tools?
Yes. Many strap replacements only need scissors, glue, and a needle and thread. Rivets need simple setters but can be done at home cheaply.
What is the best glue to repair sandal straps cheaply?
Choose a flexible shoe glue or contact cement made for footwear or leather. Flexibility matters more than brand for lasting hold.
Are zip ties a safe temporary fix for sandal straps?
Yes. Zip ties make a quick, cheap repair that holds well. They are best as temporary or low-cost long-term fixes for casual wear.
Can worn-out soles be fixed or should I replace sandals?
Minor sole wear can be under-patched, but deep wear or cracked soles usually mean replacement. Fix only if the sole still supports your foot well.
Conclusion
You can repair broken sandal straps cheaply with basic tools, simple materials, and a little care. Choose the right method for the strap type, clean and prep surfaces, and reinforce high-stress areas for longer life. Start with low-cost fixes like glue and stitching, and move to rivets or replacements only when needed. Try one simple repair today and save money while keeping your favorite sandals in rotation. Share your repair story, ask a question below, or subscribe for more practical shoe-care tips.

Rubel Miah is the Senior Editor at MyStyleGrid.com, where he brings a sharp editorial eye and an unshakable love for fashion to everything he does. A true style addict, Rubel lives and breathes trends, from streetwear to high fashion, and has a knack for turning inspiration into impactful stories. With years of experience in fashion journalism and digital media, he curates content that empowers readers to express themselves through style. When he’s not editing features or forecasting the next big thing, you’ll find him hunting down vintage pieces or capturing street style moments around the city.