You can tie shoes one handed using a loop-and-wrap method plus a stable anchor point.
I teach practical, tested ways to tie shoes one handed with clear steps, simple drills, and honest tips from real practice. I have taught this skill to friends and clients, refined methods that work for sneakers and dress shoes, and will walk you through tools, step-by-step actions, practice progressions, and common problems so you leave confident and independent.

Why learn how to tie shoes one handed?
Learning how to tie shoes one handed restores independence. It helps people with one good hand, temporary injuries, or limited mobility. The skill improves confidence and daily safety.
I combine motor-learning ideas with hands-on tricks. The steps focus on repeatable motions you can practice. Expect steady progress with short, focused drills.

Tools, shoe styles, and accessories that make it easier
Not all shoes are equal for one-handed tying. Choosing the right shoe and tools cuts frustration.
- Shoes with longer laces are easier to form loops and wraps.
- Low-top sneakers give room for finger movement.
- Flat, non-stretch laces hold knots better than slick round laces.
- Lace anchors, elastic laces, and toggle locks are helpful alternatives.
- A small clip or safety pin can anchor one lace while you work the other.
Try a mix to find what fits your routine. I recommend practicing first with a worn sneaker and simple flat laces.

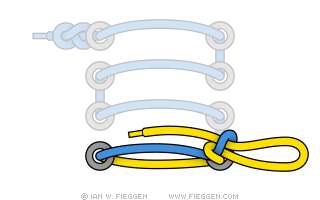
Step-by-step method: loop-and-wrap for tying shoes one handed
This method uses a secure anchor and a loop-and-wrap motion you can do with one hand. Follow each short step and repeat slowly.
- Set an anchor
- Thread one lace end under a lace anchor, table edge, or between your knee and shoe. Keep it steady.
- Make the first loop
- Use your thumb and two fingers to pinch a short loop on the free lace. Hold the base of that loop against the shoe.
- Wrap and tuck
- Wrap the free lace around the base of the loop. Tuck the tip through to form a second loop or knot.
- Tighten slowly
- Pull the loop while stabilizing the anchor to snug the knot. Small pulls tighten without losing control.
- Lock or finish
- Create a double knot by repeating the wrap-and-tuck or use a lace lock to secure the bow.
Practice the motion slowly at first. Once you repeat it, your fingers learn the pattern. If you need the phrase to remember the steps, think: anchor, loop, wrap, tuck, tighten.

Alternative techniques and adaptive methods
If loop-and-wrap is hard, try these options.
- Two-loop pull: Make two small loops and pull them together to form a bow.
- Bunny-ear substitute: Form two loops and cross them, then push one loop through—doable with grip aids.
- One-handed shoelace clamp: A small device clamps one lace while you tie the other.
- Elastic no-tie laces: Replace shoelaces with elastic bands for slip-on ease.
- Zipper or velcro conversions: Convert shoes to a different closure for long-term needs.
These alternatives reduce strain and speed up daily dressing. I use elastic laces for travel and loop-and-wrap at home.

Practice drills and progression for mastery
Short daily drills speed learning. Aim for small wins and steady practice.
- Drill 1: Loop formation — practice making a short loop 20 times with the free lace.
- Drill 2: Wrap motion — anchor one lace and wrap the other 15 times.
- Drill 3: Slow full tie — perform the entire tie slowly, five times, then increase speed.
- Drill 4: Eyes-closed tie — builds proprioception and reduces visual dependence.
- Drill 5: Real-world test — tie shoes while standing, sitting, and after walking.
Practice 5–10 minutes per day. Motor-learning research shows frequent short sessions beat long rare ones. I used these drills with a client who regained quick independence in three weeks.

Common problems, troubleshooting, and safety tips
Problems happen. Here are quick fixes and safety notes.
- Knotted laces keep slipping
- Use flat laces or add a second knot to increase hold.
- Loss of grip strength
- Try a rubber thimble or grip pad to improve friction.
- Too much movement while tying
- Sit down and anchor the shoe against your leg or a table.
- Pain while forming loops
- Reduce repetition, use adaptive tools, or switch to elastic laces.
Always check shoe fit and knot tightness before standing. If you have nerve or circulation issues, consult a clinician about long-term solutions.
Personal tips and lessons learned
From teaching and practice, these tips help fast.
- Start with long, flat laces. They give room to form loops.
- Anchor to your knee first when seated. It steadies the shoe.
- Focus on two motions: loop and wrap. Repeat them until they feel natural.
- Use alternative closures when speed matters, and save loop-and-wrap for independence practice.
I once taught a friend who had a wrist fracture. We used long laces and 10-minute daily drills. He was tying one handed within two weeks and felt proud. Mistakes I made: rushing speed before control. Slow reps fix that.

Frequently Asked Questions of how to tie shoes one handed
How long does it take to learn how to tie shoes one handed?
Most people see steady progress in 1–3 weeks with daily 5–10 minute practice sessions. Mastery speed depends on hand strength and prior dexterity.
Are there shoes that make it easier to tie one handed?
Yes. Flat-laced sneakers, long laces, and low-top shoes are best. Elastic laces and lace locks remove the need to tie at all.
Can someone with very weak grip tie shoes one handed?
Yes, with adaptations. Grip aids, lace anchors, and elastic laces work well. A therapist can recommend specific tools.
Is the loop-and-wrap method safe for elderly users?
Yes, when done while seated and using anchors. Ensure shoe fit and avoid over-tightening to prevent circulation issues.
Should I use elastic laces instead of learning to tie?
Elastic laces are a good alternative for convenience and safety. Learning to tie builds independence and is worth practicing if possible.
Conclusion
Mastering how to tie shoes one handed is a practical skill that restores independence. Use the loop-and-wrap steps, try adaptive tools, and practice short daily drills. Be patient, focus on control before speed, and pick the shoe and lace type that match your goals. Try the drills for two weeks and adjust tools as needed; share your progress or questions below to help others learn too.

Rubel Miah is the Senior Editor at MyStyleGrid.com, where he brings a sharp editorial eye and an unshakable love for fashion to everything he does. A true style addict, Rubel lives and breathes trends, from streetwear to high fashion, and has a knack for turning inspiration into impactful stories. With years of experience in fashion journalism and digital media, he curates content that empowers readers to express themselves through style. When he’s not editing features or forecasting the next big thing, you’ll find him hunting down vintage pieces or capturing street style moments around the city.