How To Make Leather Sandals: Easy DIY Guide

To make leather sandals, trace your feet, cut quality leather, attach secure straps, and shape a durable sole.

Learning how to make leather sandals is a useful craft that blends simple design, careful measuring, and patient handwork. With the right leather, basic tools, and a well-tested pattern, you can create sandals that fit better than many store-bought pairs. This guide explains each step clearly, including common mistakes, comfort tips, leather choices, and ways to make your finished sandals last.

Materials and Tools for Making Leather Sandals

Before you learn how to make leather sandals, gather every tool and material. Good preparation makes the work safer and helps prevent costly errors.

Choose full-grain or top-grain leather for the upper straps. These types are strong and become more flexible with use. For the sole, use firm vegetable-tanned leather, rubber soling, or a layered combination of both.

You will need:

• Leather for the footbed, usually 4 to 6 ounces thick

• Firm leather or rubber for the outer sole

• Leather scissors or a sharp utility knife

• A pencil, leather marker, or scratch awl

• Measuring tape

• Ruler and flexible curve

• Leather hole punch

• Stitching needles

• Waxed polyester or linen thread

• Contact cement made for leather

• A small hammer or mallet

• Sandpaper or a leather edge tool

• Buckles, rivets, or Chicago screws for closures

• A cutting mat

• Your favorite pair of comfortable sandals for reference, if available

A sharp blade is more important than a large tool collection. Dull blades pull at leather and create uneven edges. Always cut on a stable surface, keep your fingers behind the blade, and wear eye protection when setting rivets.

Vegetable-tanned leather is easy to shape and mark, but it can stiffen if soaked too long. Chrome-tanned leather is softer and more flexible, though it can be harder to glue and form. For a first pair, many makers use firm vegetable-tanned leather for the sole and flexible chrome-tanned or oil-tanned leather for the straps.

Materials and Tools for Making Leather Sandals
Source: youtube.com

How to Measure Your Feet for Leather Sandals

Accurate measurements are the foundation of how to make leather sandals. A sandal that looks attractive but pinches your toes will not become a favorite pair.

Measure both feet because most people have one foot slightly larger than the other. Measure in the afternoon or evening, when feet may be a little wider than they are in the morning.

Follow these steps:

  1. Place a sheet of paper on a hard floor.

  2. Stand on the paper with your full weight on the foot.

  3. Trace around the foot while holding the pencil straight up.

  4. Repeat the process for the other foot.

  5. Mark the longest toe and the widest part of each foot.

  6. Measure the distance from the heel to the longest toe.

  7. Measure the width across the ball of the foot.

  8. Add about 3/16 to 1/4 inch around the outline for comfort.

Do not add too much extra length. A sole that is far longer than your foot can catch on stairs and may make the sandal unstable. The toes should sit close to the front edge without hanging over it.

Your outline is only a starting point. Feet need room to spread as you stand and walk. If your toes feel crowded in most shoes, widen the front of the pattern instead of copying a narrow commercial shape.

In my own sandal projects, the most common early mistake was tracing a seated foot. Once the wearer stood up, the foot became longer and wider. Measuring while standing solved that problem and produced a much more comfortable fit.
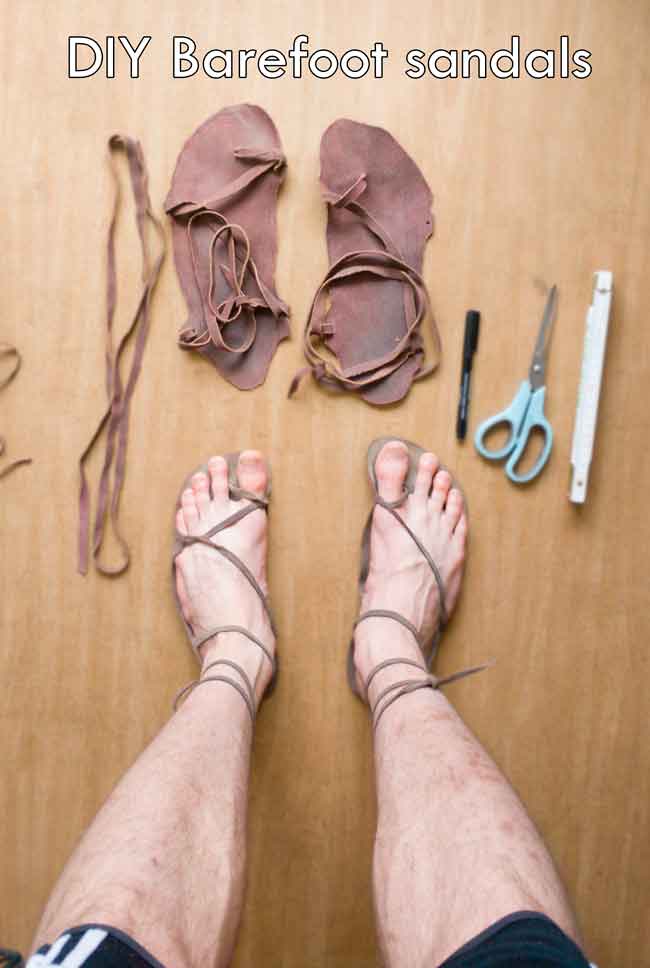
How to Measure Your Feet for Leather Sandals
Source: canadianomad.com

Creating a Leather Sandal Pattern

A pattern lets you test the shape before cutting valuable leather. Use thick paper, cardboard, or a thin sheet of craft plastic.

Place the foot tracing on your pattern material. Smooth the heel curve, round sharp corners, and create a natural toe shape. Mark the left and right foot clearly so you do not cut two soles for the same side.

Decide on the sandal style before drawing the straps. Simple designs include:

• A single wide strap across the toes

• Two crossed straps

• A toe post with a strap around the ankle

• A wide front band with an adjustable heel strap

• A closed heel with two side straps

Keep straps wide enough to spread pressure. A narrow strap may look elegant, but it can dig into the skin. For most casual sandals, straps between 1/2 and 1 inch wide are a practical starting point.

Mark every strap location on the pattern. Check that the straps do not sit directly on toe joints or on the soft center of the heel. Walk around with the paper pattern taped in place for a few minutes. This quick test often reveals problems before leather is cut.

Make a separate pattern for each foot if the shapes differ. Handmade sandals do not need to look perfectly identical. They need to match the feet that will wear them.

Creating a Leather Sandal Pattern
Source: youtube.com

Cutting the Leather Soles

Cutting is one of the most important steps in how to make leather sandals. A clean cut improves both comfort and appearance.

Place the pattern on the flesh side of the leather. Trace around it with a scratch awl or fine marker. Cut slowly with a sharp knife, using several light passes instead of one deep cut.

Keep the blade vertical. If it leans inward, the sole may become smaller than the pattern. If it leans outward, the edges may look uneven.

Cut these parts:

• One footbed for the left foot

• One footbed for the right foot

• One outer sole for each foot

• Straps based on your tested pattern

If you want extra strength, cut the outer sole slightly larger than the footbed. You can trim the layers together after gluing. This creates a cleaner edge than trying to make every piece perfect during the first cut.

For a simple home project, a leather footbed with a rubber outer sole offers a good balance of comfort, grip, and durability. A leather-only sole looks classic but may become slippery on smooth floors. Rubber improves traction, especially in wet conditions.

Do not cut the strap holes until you test the sandals. Small changes in strap position can make a major difference in fit.

Cutting the Leather Soles
Source: withmyhandsdream.com

Shaping and Softening the Leather Footbed

A flat piece of leather can become more comfortable when shaped to the foot. This process is often called molding or forming.

Lightly dampen the grain side of vegetable-tanned leather with a sponge. The leather should feel flexible, not soaked. Place it over a foot-shaped form, shoe last, or your own foot while wearing a clean plastic barrier.

Press the leather around the heel and arch. Use your fingers or a smooth modeling tool to create a gentle heel cup. Let the leather dry fully before removing it from the form.

Avoid forcing a deep arch into the footbed. Every foot is different, and an aggressive arch can cause pressure or pain. A shallow shape is usually safer for a first pair.

If you use chrome-tanned leather, test moisture on a scrap first. Some finishes darken, stain, or change texture when wet. In that case, use the leather flat or shape it with gentle hand pressure instead.

A comfortable footbed should support the foot without feeling like a hard platform. Think of it as a shallow bowl, not a rigid brace.

Shaping and Softening the Leather Footbed
Source: youtube.com

Making and Attaching the Straps

The straps control both comfort and security. Learning how to make leather sandals well means paying close attention to strap placement.

Cut each strap with smooth, even edges. A strap that changes width can twist or press into the skin. Round the strap corners with a small knife or edge tool to reduce sharp points.

For adjustable straps, mark holes with equal spacing. Punch the holes on a firm surface and use a hole size that matches the buckle tongue or fastening hardware.

You can attach straps with:

• Leather stitching

• Rivets
• Chicago screws

• A toe post secured between sole layers

Stitching gives a traditional look and allows some repair. Rivets are fast, but they must be set firmly and covered or positioned so they do not touch the foot. Chicago screws make replacement easier, though they can loosen unless secured properly.

Before permanent attachment, tape or clamp the straps to the footbed. Wear the unfinished sandal for five to ten minutes. Check for pressure on the toes, top of the foot, and area between the toes.

Place the toe post between the first and second toes, not against either toe. Leave enough room for natural movement. If the post causes rubbing, switch to a cross strap or a wider front band.

My best lesson from making leather sandals was to delay final fastening. I once placed a side strap too far forward because it looked balanced on the pattern. A short walking test showed that it pulled the sandal sideways. Moving it back by less than an inch fixed the problem.

Making and Attaching the Straps
Source: dreamalittlebigger.com

Gluing and Stitching the Sandal Layers

Once the fit is approved, prepare the layers for assembly. Lightly roughen the bonding areas with medium-grit sandpaper. This gives the adhesive a better surface to grip.

Clean away dust before applying contact cement. Spread a thin, even coat on both surfaces, then follow the adhesive maker’s instructions for drying time. Do not press the layers together too early, because wet contact cement can create a weak bond.

Align the heel and outer edges first. Press from the center toward the sides to reduce air pockets. Use clamps or heavy books with a clean protective sheet between them and the leather.

For a stitched sole, mark the stitch line about 1/8 to 3/16 inch from the edge. Punch holes at even intervals. A spacing of about 1/8 to 1/4 inch works well for many casual sandals.

Use a saddle stitch for strong hand-sewn seams. It locks each stitch and remains more reliable than a simple running stitch. Pull the thread firmly, but do not tighten so much that the leather puckers.

Glue alone may work for some layered soles, but stitching adds security. For sandals used outdoors or worn often, a combined adhesive and stitch method is usually more dependable.

Gluing and Stitching the Sandal Layers
Source: youtube.com

Finishing the Edges

A smooth edge makes handmade leather sandals look polished and feel better against the skin. It also helps reduce fraying and moisture absorption.

Trim the sole layers so they match. Use a sharp knife for major excess and sandpaper for small corrections. Sand with steady strokes around the full edge instead of focusing on one small area.

You can finish the edge in several ways:

• Leave it natural and lightly burnish it

• Apply leather edge paint

• Add a thin edge coat or wax

• Round the edge with an edge beveler

For vegetable-tanned leather, dampen the edge slightly and rub it with canvas or a smooth wooden tool. Friction compresses the fibers and creates a cleaner surface. Do not burnish too hard, since heat and pressure can darken or distort the leather.

Apply leather conditioner sparingly. Too much oil can soften the sole and reduce support. Test any dye, wax, or finish on a scrap from the same hide before using it on the sandals.

Let all finishes dry fully before wearing the sandals. Solvent smells and uncured products can irritate the skin.

Finishing the Edges
Source: marnixvanwelie.nl

Testing the Fit and Breaking In the Sandals

New leather sandals often need a short break-in period. Wear them indoors for 15 to 20 minutes at first. Look for red spots, slipping, pinching, or unusual pressure.

Make small adjustments early. You may be able to:

• Move a buckle hole

• Soften a strap edge

• Add a thin leather pad

• Trim a small area near the toes

• Replace a rivet with stitching

• Add a textured rubber sole

Do not take new sandals on a long hike right away. Leather needs time to relax, and your skin needs time to adapt. Increase wear gradually over several days.

Pay attention to walking balance. The sandal should stay under your foot without sliding forward or twisting. If it shifts, the straps may be too loose, too far apart, or placed at the wrong angle.

Comfort is more important than visual symmetry. A handmade pair may have tiny differences, but both sandals should support natural movement and protect the foot.

Testing the Fit and Breaking In the Sandals
Source: youtube.com

Common Mistakes to Avoid

Many first-time makers search how to make leather sandals because they want a simple project. The process is approachable, but a few mistakes can lead to poor fit or wasted materials.

Avoid these common problems:

• Using thin fashion leather for the sole, which may stretch and wear quickly

• Cutting the final leather before testing a paper pattern

• Making the toe area too narrow

• Placing straps over sensitive joints

• Skipping edge finishing

• Using too much adhesive

• Setting rivets where they can rub the foot

• Wearing the sandals outdoors before checking the fit

• Applying heavy oil that makes the sole soft

• Ignoring the difference between the left and right foot

Another common mistake is copying a sandal pattern without considering foot shape. A pattern that works for one person may cause pressure for another. Measure, test, and adjust instead of trusting a fixed template.

Also avoid making the straps overly tight. Leather may soften with wear, but it will not always stretch in the direction you expect. Start with a secure fit that still allows comfortable movement.

How to Care for Handmade Leather Sandals

Good care can extend the life of your sandals. Keep them away from long periods of water, even if the leather has been treated.

After wearing them, wipe away dust with a soft cloth. Let damp sandals dry at room temperature. Do not place them beside a heater, because rapid heat can shrink, crack, or harden leather.

Use a small amount of leather conditioner when the surface looks dry. The correct product depends on the leather finish. Heavy oils may darken leather and weaken a soft footbed, so always test first.

Store the sandals in a cool, dry place. Keep them flat or use paper to support their shape. Replace worn rubber soles before the leather footbed becomes damaged.

With regular use, straps and fasteners may loosen. Check rivets, screws, and stitching every few weeks. Early repairs are usually simple. Delayed repairs can damage the sole or cause a sudden loss of support.

Safety and Material Limits

Making leather sandals is a useful craft, but handmade footwear has limits. A casual sandal is not automatically suitable for construction work, long-distance hiking, slippery trails, or medical foot conditions.

Use footwear made for the activity when you need special protection. People with diabetes, reduced foot sensation, serious alignment concerns, or recurring foot pain should ask a qualified health professional before relying on handmade footwear.

Leather tools are sharp, and adhesives may release strong fumes. Work in a well-ventilated space, follow product labels, and keep blades away from children. Wear gloves when appropriate, but do not sacrifice control while cutting.

If the sandals cause numbness, blistering, sharp pain, or changes in walking, stop wearing them and adjust the design. Comfort problems are not something to push through.

Frequently Asked Questions About How to Make Leather Sandals

What type of leather is best for making sandals?

Firm vegetable-tanned leather works well for footbeds and structured soles. Flexible oil-tanned or chrome-tanned leather is often better for straps because it bends comfortably against the foot.

How thick should leather sandals be?

A footbed of about 4 to 6 ounces can work for many casual designs, while the outer sole may be thicker or made from rubber. The ideal thickness depends on the wearer, sole material, and intended use.

Can I make leather sandals without sewing?

Yes, you can use leather adhesive, rivets, or screws instead of stitching. However, stitching or a combination of adhesive and stitching often provides better long-term security for frequently worn sandals.

How do I stop leather sandal straps from rubbing?

Round and smooth the strap edges, then test the sandals indoors before extended wear. You can also widen the strap, move its position, or add a thin soft leather lining.

How long does it take to make leather sandals?

A simple pair may take several hours, not counting drying time. Beginners often need a full day because pattern testing, shaping, gluing, and finishing require patience.

Are handmade leather sandals waterproof?

Most leather sandals are water resistant at best, not fully waterproof. Repeated soaking can stain leather, weaken adhesives, and change the shape of the footbed.

How can I make leather sandals more comfortable?

Use a foot-shaped pattern, leave enough room for the toes, soften strap edges, and break the sandals in slowly. A flexible rubber sole can also improve grip and walking comfort.

Conclusion

Learning how to make leather sandals starts with careful foot measurements, a tested paper pattern, and suitable leather. Cut slowly, shape the footbed gently, position the straps for comfort, and secure the layers with reliable adhesive, stitching, or hardware. Finish the edges and test the sandals indoors before taking them outside.

Your first pair may not be perfect, and that is part of the craft. Each fitting test teaches you more about leather, balance, and the unique shape of your feet. Gather your materials, make a simple pattern, and begin with a design that values comfort over decoration. Share your results or explore more leatherworking guides as your skills grow.

Leave a Reply

Your email address will not be published. Required fields are marked *