How to add grip to shoes: clean soles, roughen rubber, use traction pads, or apply sole glue.
I’ve worked with outdoor gear and tested many fixes, so I know what works and what doesn’t when it comes to how to add grip to shoes. This guide explains practical methods, tools, and maintenance tips you can try at home, and it shows when to call a pro for resoling or replacement. Read on to learn step-by-step solutions for slippery soles and to pick the right approach for your shoes and activities.

Why shoe grip matters and what causes slips
Good traction keeps you stable, reduces falls, and helps performance. Poor grip makes walking or hiking risky, damages shoes faster, and lowers confidence on wet or icy surfaces.
Common causes of slippery soles:
- Smooth or worn rubber treads that lose bite on wet surfaces.
- Hard synthetic soles that don’t deform to match ground texture.
- Oil, dirt, or polish buildup that reduces friction.
- Cold and icy conditions that change rubber behavior.
Understanding these causes helps you choose the best way to learn how to add grip to shoes for your situation.

How to add grip to shoes: proven methods and step-by-step instructions
Below are reliable ways to add grip to shoes. I include easy DIY fixes, intermediate options, and professional choices. Pick one or combine methods for the best result.
Clean and prep the sole before any fix
Simple cleaning often restores grip. Steps:
- Remove loose dirt with a brush.
- Wash soles with warm water and dish soap.
- Use rubbing alcohol to remove oils or polish residues.
- Dry completely before applying anything.
This small step is the first part of how to add grip to shoes because adhesion and texture depend on a clean surface.
Roughen the outsole for immediate traction
Roughening helps rubber bite.
- Use 80–120 grit sandpaper or a metal brush.
- Rub across worn areas to expose fresh texture.
- Don’t sand too deep; you only need to increase surface friction.
Roughening is quick and often helps dress shoes and sneakers regain traction.
Add traction pads, sole stickers, or heel grips
Pre-made pads are fast and non-permanent.
- Peel-and-stick rubber or TPU pads work well for indoor slips.
- Anti-slip heel grips add traction to smooth leather soles.
- Look for pads with textured or studded patterns.
These are a great first choice when learning how to add grip to shoes without altering appearance permanently.
Use sole treatments and sprays
There are sprays and adhesives that increase friction.
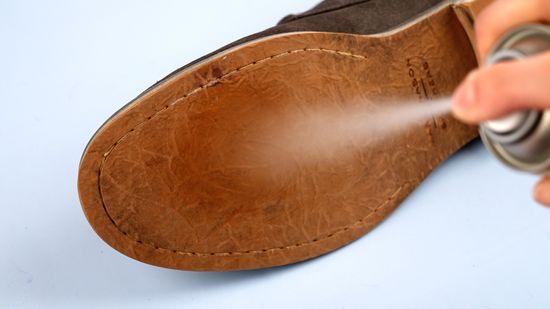
- Anti-slip sprays add micro-roughness to soles.
- Apply evenly, let dry, and test on a safe surface.
- Reapply periodically; these are not permanent solutions.
Treatments are useful for light, short-term improvements.
Apply rubber sole cement, Shoe Goo, or Sugru for tactile repairs
For deeper fixes use adhesive-based products.
- Clean and sand the area first.
- Apply a thin layer of shoe adhesive or moldable rubber.
- Shape as needed, then cure per manufacturer instructions.
This method is effective when small sections of tread are missing and you want a long-lasting repair.
Hot glue or silicone for temporary traction
Quick and cheap for short-term needs.
- Create small dots or strips of hot glue on the sole.
- Let cool fully before use.
- Not durable for long-term walking, but good for a temporary grip boost.
Use this only when you need a fast, one-off fix.
Replace soles or get professional resoling
If tread is mostly gone, resoling is the most reliable fix.
- A cobbler can add a Vibram sole or resole with more slip-resistant rubber.
- Resoling restores factory-level grip and often extends shoe life.
Consider professional resoling when learning how to add grip to shoes for heavy use or valued footwear.
Add seasonal traction: ice cleats and studs
For winter hazards choose removable traction devices.
- Microspikes and slip-on cleats work for snow and ice.
- Studs are ideal for work boots or frequent icy commutes.
- Remove them indoors to protect floors.
Seasonal devices are one of the best preventive ways to manage slippery surfaces.

Tips for specific shoe types
Different shoes need different approaches. Here are targeted tips I’ve used across projects.
For sneakers:
- Clean and sand lightly, then add adhesive pads where the sole is smooth.
- Consider full-sole rubber replacement for worn running shoes.
For leather dress shoes:
- Use stick-on sole protectors or a cobbler’s rubber half-sole.
- Avoid aggressive sanding that can remove sole shape.
For work boots:
- Opt for resoling with heavy-duty lug soles or add screw-in studs.
- Keep soles clean and inspect regularly for embedded grit and oil.
For heels and flats:
- Thin traction stickers or toe pads work best to avoid changing fit.
- Add a cobbler-applied thin rubber sole if you need more durable grip.
These tips reflect what I learned testing gear and fixing shoes for friends. Small, targeted fixes often give the best balance of look and function.

Safety, limits, and maintenance
Know what each method can and cannot do. That keeps you safe and sets realistic expectations.
Safety tips:
- Test any change in a safe area before wearing them in traffic or on stairs.
- Avoid DIY fixes that change balance or increase trip risk.
- For work or athletic environments, choose professional solutions when liability or performance matters.
Limitations:
- Some adhesives wear faster than factory soles.
- Treatments may reduce slip indoors on polished floors even if they help outdoors.
- Seasonal devices add bulk and can affect gait.
Maintenance steps:
- Reclean soles regularly to prevent buildup.
- Inspect traction pads and replace when worn.
- Reapply sprays or adhesives per instructions.
Being honest about limitations is part of how to add grip to shoes responsibly. It prevents false expectations and reduces risk.

Frequently Asked Questions of how to add grip to shoes
How long do stick-on traction pads last?
Stick-on pads can last several months to a year, depending on wear and conditions. Replace them when edges peel or the texture smooths out.
Will sanding my shoe soles damage them?
Light sanding to roughen the surface is safe, but heavy sanding can thin the sole and shorten its life. Sand sparingly and test small areas first.
Are home remedies like hot glue safe for hiking?
Hot glue is only a temporary fix and not reliable for long hikes. Use professional resoling or proper hiking sole repairs for safety and durability.
Can anti-slip spray ruin my shoes?
Properly used sprays usually don’t harm the shoe, but they may reduce slip indoors and need reapplication. Test on a small area first.
When should I seek a cobbler instead of DIY fixes?
If tread is nearly gone or the shoe is expensive and used often, see a cobbler for resoling. Professional work lasts longer and offers better traction.
Conclusion
Adding grip to shoes is often quick and affordable, but the best approach depends on the shoe type, how you use them, and how long you need the fix to last. Start by cleaning and testing simple solutions like roughening or traction pads, then move to adhesives or professional resoling for heavy wear. Take action today: pick one method, test it safely, and keep your shoes and routines updated to avoid slips. Share your results or questions below, or subscribe for more practical gear and shoe care tips.

Madison Clark is a footwear expert and the voice behind MyStyleGrid.com. She specializes in honest shoe reviews, style tips, and practical guides to help readers find the perfect pair for any occasion. With years of experience in blogging and content creation, Madison makes footwear knowledge simple, stylish, and easy to follow.