Tie the ribbons so they cross at the ankle and finish with a flat knot behind the Achilles.
I’ve spent years fitting pointe shoes, teaching dancers, and tying ribbons for rehearsals and performances. This guide shows exactly how to tie pointe shoe ribbon with step-by-step clarity, practical tips from real fittings, and troubleshooting you can use tonight before class. Read on and you’ll learn safe, clean, and stage-ready ways to secure your pointe shoes every time.

Why proper ribbon tying matters
Tying ribbons the right way keeps your foot safe and your line clean. A secure ribbon fit prevents slipping, reduces blisters, and helps stabilize the ankle on pointe.
How to tie pointe shoe ribbon affects balance, comfort, and shoe lifespan. When done well, ribbons support the heel and allow dancers to rise and point without distracting adjustments.
Proper technique also looks better onstage. A tidy ribbon lay makes legs appear longer and prevents stray tails under costumes.

Materials and preparation before you tie
Gather the right tools before you learn how to tie pointe shoe ribbon. You will need:
- Ribbons sized for your shoe and ankle
- Heavy-duty sewing thread and a curved needle
- Scissors and a lighter or fray seal
- Optional: elastic, toe pads, or heel grips
Prepare ribbons by folding ends to prevent fray. Sew ribbons to shoes with secure backstitching where manufacturers recommend. Measure ribbon length by wrapping around the ankle once or twice; typical lengths range from 18 to 36 inches depending on height and wrap style.
A proper pre-tie check reduces mid-class adjustments and keeps focus on dancing.

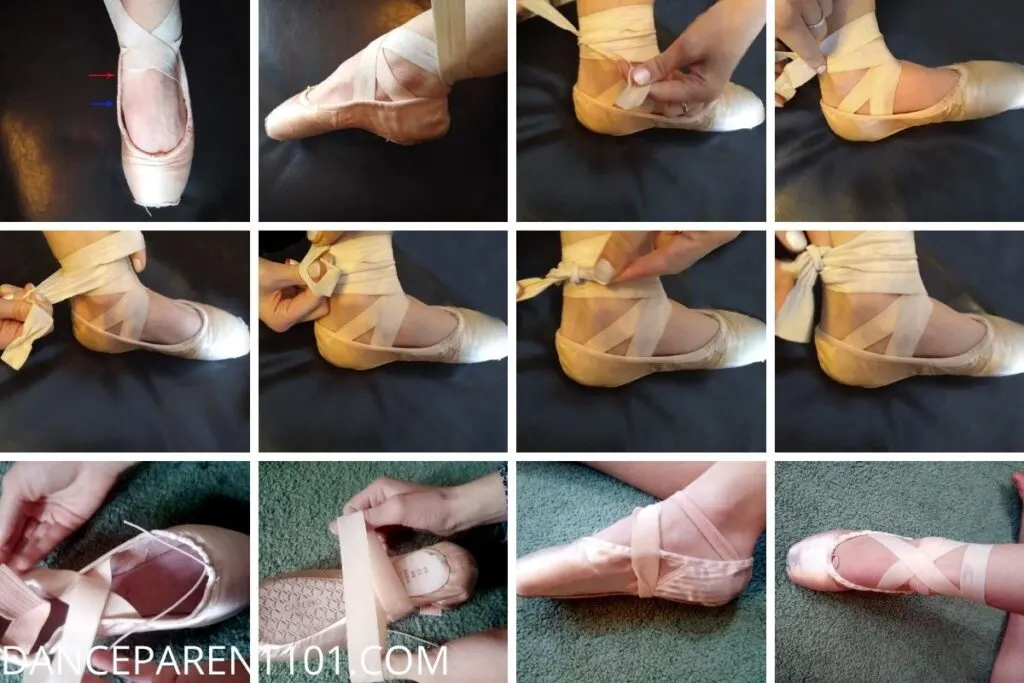
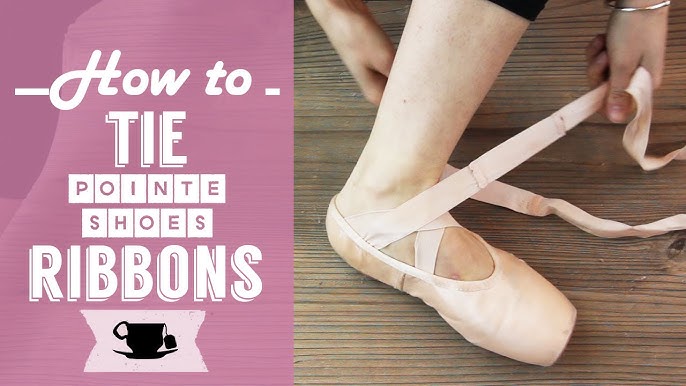
Step-by-step: tying pointe shoe ribbons
Follow these simple steps to learn how to tie pointe shoe ribbon. Read once, then practice slowly.
- Position the shoe and ribbons
- Put the shoe on and align the heel snugly.
- Hold the inner ribbon across the arch toward the outside ankle.
- Cross and wrap
- Cross the inner ribbon over the foot and around the back of the ankle.
- Bring the outer ribbon across the top and cross it over the first ribbon.
- Wrap to the knot spot
- Wrap both ribbons neatly around the ankle 1–2 times. Keep fabric flat and smooth.
- Avoid twisting ribbons; a flat ribbon prevents pressure points.
- Tie a secure flat knot
- Tie a square (flat) knot behind the Achilles, not on the side or front.
- Double-knot if needed, but keep the knot flat for comfort.
- Tuck and trim tails
- Tuck ribbon tails under the wrapped ribbon or into the shoe if allowed.
- Trim any excess and seal ends to prevent fray.
Practice how to tie pointe shoe ribbon slowly until the motion becomes fluid. Onstage, speed matters, but accuracy matters more.
Variations and stylistic wraps
Different dancers and teachers prefer slight variations for support and aesthetics. Try these safe options when appropriate.
-
Single wrap with elastic
- Wrap once and secure elastic across the top for a neater line.
- Useful for dancers with low ankles or when a slimmer look is desired.
-
Cross-over high wrap
- Cross ribbons higher on the ankle for extra support.
- Do not over-tighten; this can limit circulation.
-
Heel-laced method
- Sew a small loop of ribbon to anchor at the heel and wrap from the loop.
- Provides consistent placement for quick dressing.
Experiment in class, not performance, and ask a teacher or fitter for approval before changing your stage look.

Common mistakes and quick fixes
Here are frequent errors I see when dancers learn how to tie pointe shoe ribbon and how to fix them.
-
Knot placed on the side
- Problem: It rubs and shows.
- Fix: Always tie behind the Achilles.
-
Twisted ribbons
- Problem: Pressure points and ugly lines.
- Fix: Smooth ribbons as you wrap; check each layer.
-
Ribbons too short or too long
- Problem: Short ribbons chafe; long ribbons dangle.
- Fix: Measure while standing and add 2–4 inches for tucking.
-
Over-tightening
- Problem: Cuts circulation and limits turnout.
- Fix: Aim for firmness without pinching; test circulation after tying.
These fixes come from years of rehearsal-room troubleshooting and quick changes backstage.

Caring for ribbons and shoes after tying
Ribbons need care to last and look good. Cleaning and maintenance extend ribbon life and keep how to tie pointe shoe ribbon consistent.
- Hand wash ribbons gently in cold water if they become sweaty.
- Let ribbons air dry flat to avoid mildew.
- Replace ribbons if they fray, stretch, or lose color.
- Reinforce sewn ribbons if stitches show wear.
Rotate shoes and ribbons for class and rehearsals to reduce wear and avoid sudden failures onstage.
My experience, mistakes, and tips
I once fitted a company where nearly every dancer tied ribbons differently. A simple policy—ribbon sewn and knot behind the Achilles—cut shoe problems by half. Lessons I learned:
- Standardize your tie for consistency in rehearsals.
- Always test ties in relevé and simple center combinations before performing.
- Keep spare ribbons, thread, and a needle in your dance bag.
A quick tip: take a mirror selfie after tying. You’ll notice twists and uneven wraps you miss in the mirror at floor level.

Frequently Asked Questions of how to tie pointe shoe ribbon
How tight should pointe shoe ribbons be?
Ribbons should be snug but not constricting. You should feel support around the ankle without numbness or pain.
Where should I knot my pointe shoe ribbons?
Tie the knot behind the Achilles tendon at the natural hollow. This placement is secure and hides the knot from the stage front.
How long should my ribbons be?
Length depends on wrap style and ankle height, but most dancers use 18 to 36 inches per ribbon. Measure by wrapping and adding a few inches for tucking.
Can I sew my own ribbons onto shoes?
Yes, you can sew ribbons onto shoes if you know the correct placement and use strong stitches. If unsure, ask a professional fitter to avoid damage.
How often should I replace ribbons?
Replace ribbons when they fray, stretch, or lose their grip. For active dancers, this may be every few months or sooner with frequent rehearsals.
Should I double-knot my ribbons for performances?
Double-knotting is acceptable for safety but keep the knot flat and tidy. Test the knot in rehearsal to ensure it won’t interfere with pointe work.
Conclusion
Mastering how to tie pointe shoe ribbon keeps you safe, comfortable, and confident on stage. Use the step-by-step method, avoid common mistakes, and practice your wrap until it becomes second nature. Try the techniques in class tonight, adjust based on comfort and teacher feedback, and leave a comment with your favorite tie or a tip you’ve learned.

Rubel Miah is the Senior Editor at MyStyleGrid.com, where he brings a sharp editorial eye and an unshakable love for fashion to everything he does. A true style addict, Rubel lives and breathes trends, from streetwear to high fashion, and has a knack for turning inspiration into impactful stories. With years of experience in fashion journalism and digital media, he curates content that empowers readers to express themselves through style. When he’s not editing features or forecasting the next big thing, you’ll find him hunting down vintage pieces or capturing street style moments around the city.